16 min read
Imagine transforming your bathroom experience with just a simple addition. A non-electric bidet offers a touch of luxury, improved hygiene, and an eco-friendly alternative to traditional practices.
You might think installing one is complicated or requires a professional, but it’s easier than you think—and you can do it yourself! In this guide, we’ll walk you through the DIY installation of a non-electric bidet, showing you how straightforward it can be.
By the end of this article, you’ll not only feel empowered to enhance your bathroom but also enjoy the benefits of your own handiwork. Let’s dive into how you can achieve this transformation effortlessly and affordably.
Choosing The Right Bidet
Installing a non-electric bidet is a simple way to improve bathroom hygiene. Picking the right bidet matters for comfort and ease of use.
There are many types of non-electric bidets available. You should know what to look for before buying one.
Types Of Non-electric Bidets
Non-electric bidets come in different styles. Each type fits different bathroom setups and user needs.
- Handheld Bidet Sprayer:A nozzle attached to a hose. You control the spray with a trigger.
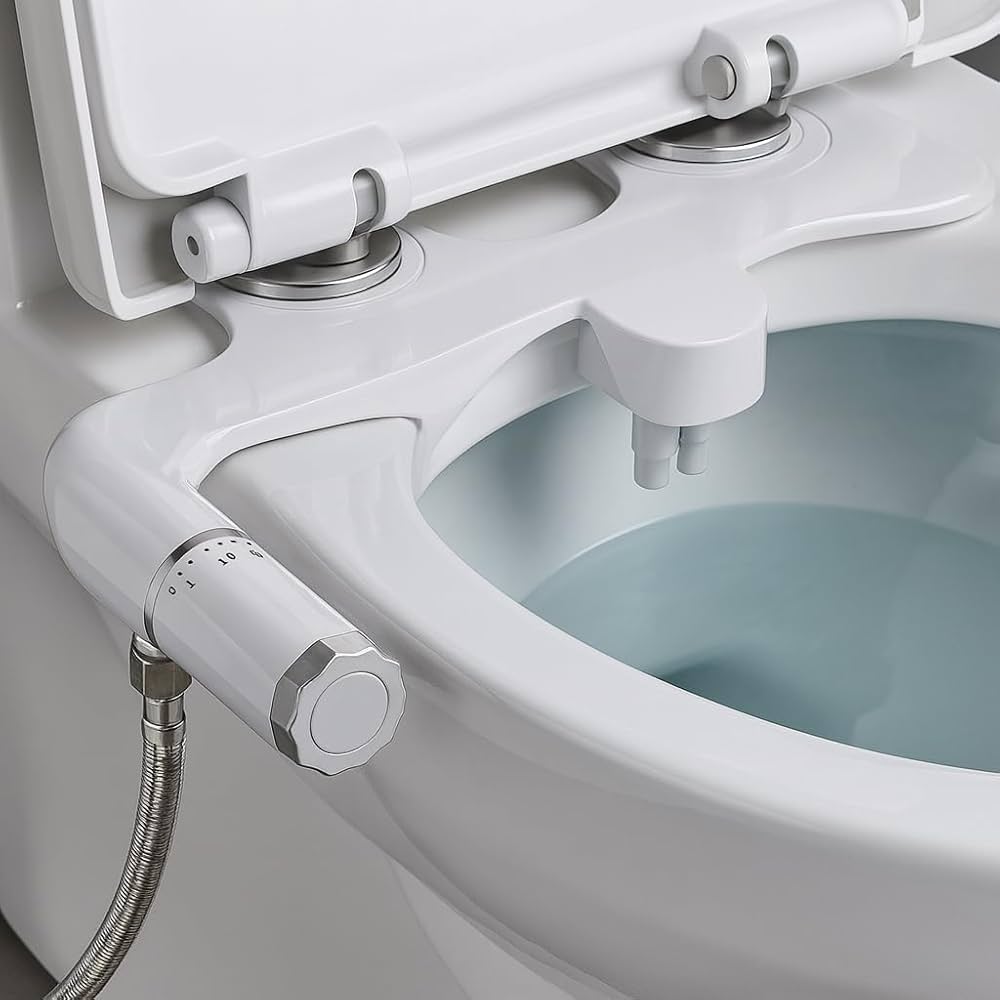
- Bidet Toilet Seat Attachment:A seat add-on with built-in water spray nozzles.
- Standalone Bidet Fixture:A separate sink-like fixture next to the toilet.
Key Features To Consider
Look for features that add comfort and ease. These make your bidet more useful and enjoyable.
- Adjustable Water Pressure:Helps you control the spray strength.
- Temperature Control:Some models offer warm or cool water options.
- Nozzle Position:Adjustable nozzles target cleaning areas better.
- Easy Installation:Choose models that fit your toilet without extra tools.
- Self-Cleaning Nozzles:Keeps the bidet clean and hygienic.
Budget And Quality
Set a budget before shopping for a bidet. Price affects quality but not always comfort.
Cheaper bidets can work well but check materials and reviews. Higher prices often mean better build and features.
- Basic models cost less and have simple functions.
- Mid-range bidets add comfort features like adjustable spray.
- High-end models use durable materials and offer extra options.
Tools And Materials Needed
Installing a non-electric bidet is a simple task. You need some basic tools and supplies. Having the right items makes the job easier and faster.
This guide lists the tools and materials to prepare before starting your bidet installation.
Essential Tools
These tools help you connect the bidet to your toilet and water supply. Most are common household items.
- Adjustable wrench – to tighten or loosen nuts
- Screwdriver (flathead and Phillips) – for screws
- Teflon tape – to seal water connections
- Utility knife – to cut tape or packaging
- Bucket or small container – to catch water drips
- Measuring tape – to check fitting sizes
Additional Supplies
These supplies support the installation and improve the bidet’s function. Some may come with your bidet kit.
- Bidet attachment or seat
- Water supply hose or T-valve
- Rubber washers or gaskets
- Cleaning cloth or towel
- Plumber’s putty (optional) – for extra sealing
Preparing Your Bathroom
Installing a non-electric bidet is simple if you prepare well. Getting your bathroom ready saves time and effort.
Check your space and tools before you start. This helps the installation go smoothly.
Shutting Off Water Supply
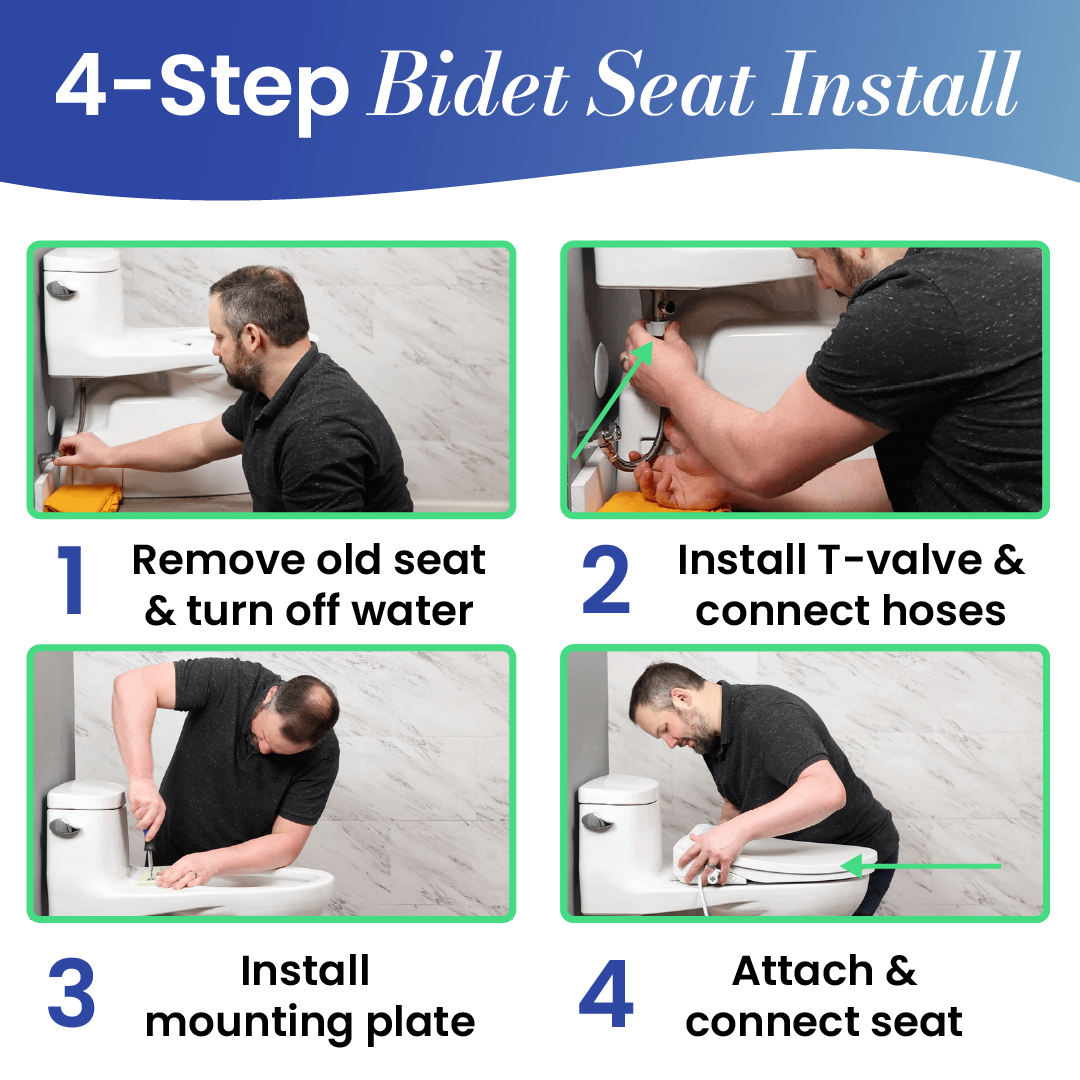
Turn off the water supply before you remove the toilet seat. This stops water from leaking during installation.
Look for the shut-off valve near the toilet’s base. It usually connects the water pipe to the tank.
- Turn the valve clockwise to close it
- Flush the toilet to empty the tank
- Use a towel to soak any leftover water
Removing Existing Toilet Seat
Remove the old toilet seat to make space for the bidet. This step is easy with basic tools.
Find the bolts under the seat that hold it in place. Use a screwdriver or wrench to loosen them.
- Hold the nut under the seat while unscrewing
- Lift the seat and hinges off the toilet
- Clean the area before installing the bidet

Credit: www.amazon.in
Installing The Bidet Seat
Installing a non-electric bidet seat is simple and does not need special tools. You can do it yourself with a few easy steps.
This guide will help you install the bidet seat properly for a good fit and safe use.
Aligning The Bidet
Start by placing the bidet seat over your toilet bowl. Make sure it fits the shape of the bowl well.
Check that the holes on the bidet seat line up with the holes on the toilet. Proper alignment makes the seat stable.
- Lift the seat and place it gently on the toilet
- Match the seat’s bolt holes with the toilet’s holes
- Adjust the seat so it sits evenly on the bowl
Securing The Seat
Once aligned, insert the bolts through the holes to hold the seat in place. Use the nuts to tighten the bolts.
Do not overtighten the nuts. Tighten just enough to keep the seat from moving but avoid cracking the toilet.
- Insert bolts through the bidet seat and toilet holes
- Hand-tighten the nuts onto the bolts
- Use a wrench to snug the nuts gently
- Check that the seat does not shift when pressed
Connecting Water Supply
Installing a non-electric bidet requires connecting it to the water supply. This step is important to make sure water flows correctly to the bidet.
You will need to attach a T-valve and connect hoses from the water source to the bidet. These parts help control the water flow safely and easily.
Attaching T-valve
The T-valve splits the water line between your toilet and bidet. Turn off the main water supply before starting this step.
Unscrew the water hose from the toilet tank. Then, screw the T-valve onto the toilet’s water inlet. Make sure it fits tightly to avoid leaks.
- Turn off water supply
- Remove water hose from toilet
- Attach T-valve to toilet inlet
- Reattach water hose to T-valve
- Check all connections for tightness
Connecting Hoses
After the T-valve is attached, connect one hose from the T-valve to the bidet. This hose carries water to the bidet for use.
Use the hose that came with your bidet or a similar flexible hose. Tighten all connections by hand, then use a wrench to secure them gently.
- Attach hose to T-valve outlet
- Connect other end to bidet inlet
- Tighten connections by hand
- Use wrench to secure connections
- Turn on water and check for leaks

Credit: www.manybidets.com
Testing And Adjustments
After installing your non-electric bidet, testing and adjustments are key. This helps ensure it works properly and safely.
Check the bidet carefully for any leaks and set the water pressure to a comfortable level.
Checking For Leaks
Turn on the water supply slowly. Watch all connections and hoses closely. Look for any water drops or wet spots.
If you see leaks, tighten the connections gently. Use a cloth to avoid scratching the parts. Check again to confirm no water escapes.
- Inspect connections near the water supply valve
- Check hoses and the bidet nozzle area
- Look under the toilet for any drips
- Tighten fittings if needed but do not overtighten
Adjusting Water Pressure
Adjust the water pressure to suit your comfort. Most non-electric bidets have a control knob or lever for this.
Start with low pressure. Test the spray and increase pressure slowly until it feels right. Avoid setting pressure too high.
- Turn the control knob or lever slowly
- Test spray with your hand or a tissue
- Stop if the spray feels too strong or weak
- Keep the pressure steady during use
Maintenance Tips
Keeping your non-electric bidet clean and working well is easy. Regular care helps it last longer.
Follow simple steps to maintain your bidet. This saves time and avoids problems.
Regular Cleaning
Clean the bidet seat and nozzle often. Use mild soap and warm water. Avoid harsh chemicals.
Wipe dry after cleaning to stop water spots. Clean at least once a week for best results.
- Use soft cloth or sponge
- Do not scrub hard
- Clean nozzle with soft brush
- Check for buildup or dirt
Troubleshooting Common Issues
If water flow stops or weakens, check the water supply valve. Make sure it is open fully.
Look for leaks around connections. Tighten loose parts gently with a wrench or pliers.
- No water: Confirm water valve is open
- Low pressure: Clean the nozzle filter
- Leaks: Tighten fittings carefully
- Nozzle stuck: Clean and lubricate gently

Credit: www.ubuy.tg
Frequently Asked Questions
What Tools Are Needed For Non-electric Bidet Installation?
You need a wrench, screwdriver, T-valve, and plumber’s tape. These tools ensure a secure and leak-free bidet setup. Most bidet kits include installation instructions for easy guidance.
How Long Does Diy Bidet Installation Take?
Non-electric bidet installation typically takes 30 to 60 minutes. It depends on your plumbing skills and toilet model. Following step-by-step instructions speeds up the process.
Can I Install A Bidet Without Professional Help?
Yes, most non-electric bidets are designed for DIY installation. Clear instructions and basic tools make it manageable for beginners. However, seek help if plumbing issues arise.
Will Non-electric Bidets Fit All Toilet Types?
Most bidets fit standard toilets, but check compatibility before purchase. Some models suit round or elongated bowls differently. Measure your toilet to ensure a proper fit.
Conclusion
Installing a non-electric bidet by yourself saves money and effort. The steps are simple and clear, even for beginners. This upgrade improves hygiene and adds comfort to your bathroom. You only need basic tools and a little patience. Enjoy a cleaner, fresher feeling every day.
Taking time to follow the instructions ensures success. A non-electric bidet fits most toilets easily. Try it and see the difference at home.


