

18 min read
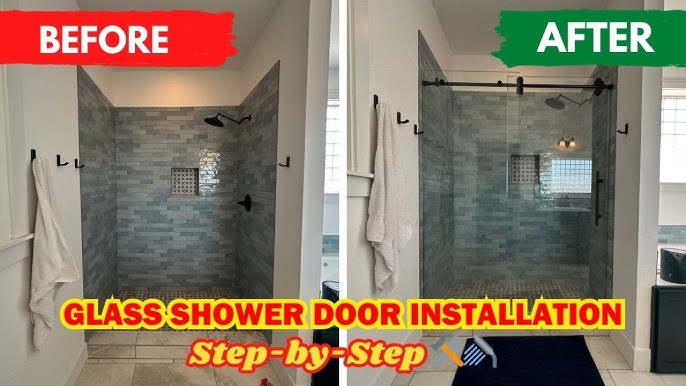
Are you tired of your old shower curtain that never stays in place? Installing sliding shower doors can transform your bathroom instantly.
Not only do they look sleek and modern, but they also keep water where it belongs—inside the shower. Imagine stepping into your bathroom and seeing a clean, stylish space that feels bigger and more inviting. If you’ve been thinking about upgrading, this guide will show you how to install sliding shower doors easily, even if you’re not a pro.
Keep reading, and you’ll discover simple steps to make your bathroom better without the hassle or high costs.
Choosing The Right Sliding Shower Door
Installing sliding shower doors improves your bathroom’s look and function. Choosing the right door makes the process easier.
Consider your shower space, door materials, and style to find the best fit. These factors help you pick a door that lasts and looks good.
Measuring Your Shower Space
Measure the width and height of your shower opening carefully. Accurate measurements help avoid buying the wrong door size.
Check the space for door movement. Sliding doors need enough room to open and close smoothly.
- Measure the shower width at the top, middle, and bottom
- Use the smallest width for door size
- Measure height from the shower base to the top edge
- Look for any obstacles near the shower that could block the door
Selecting Door Materials
Sliding shower doors come in different materials. Pick one that fits your budget and bathroom style.
Glass is popular for its clean look and durability. Plastic or acrylic doors are lighter and cost less.
- Tempered glass: strong and safe
- Frosted glass: adds privacy
- Acrylic: lightweight and affordable
- Aluminum or stainless steel frames: resist rust and corrosion
Picking A Style That Matches
Choose a door style that matches your bathroom’s design. Sliding doors come in many styles to fit different looks.
Think about the frame finish, glass texture, and door handles. These details create a unified look.
- Frameless doors: modern and sleek
- Framed doors: classic and sturdy
- Clear glass: open and bright
- Textured or frosted glass: adds privacy
- Chrome, brushed nickel, or black frames: different finishes to match fixtures
Gathering Tools And Materials
Installing sliding shower doors needs the right tools and parts. Getting everything ready helps the job go smoothly.
Check your supplies before you start. This saves time and avoids frustration during installation.
Essential Tools Checklist
You need some basic tools to install sliding shower doors safely and correctly. Make sure each tool is ready and working.
- Measuring tape to get exact dimensions
- Level to keep doors straight
- Drill for making holes
- Screwdriver for fastening screws
- Rubber mallet to gently tap parts in place
- Silicone sealant and caulking gun for waterproofing
- Utility knife to cut seals or packaging
- Safety glasses to protect your eyes
- Work gloves for hand protection
Necessary Hardware Components
Sliding shower doors come with specific hardware. Gather all parts to avoid delays during setup.
- Sliding door panels made of glass or acrylic
- Top and bottom tracks for door movement
- Rollers or wheels attached to door edges
- Door handles for easy opening and closing
- Mounting brackets to fix tracks to walls
- Screws and anchors for secure installation
- Door stoppers to prevent sliding too far
- Weather stripping or seals to keep water inside
Preparing The Shower Area
Preparing the shower area is important before installing sliding shower doors. This helps the doors fit well and last longer.
Cleaning the space and removing old items makes the installation easier and safer.
Cleaning And Clearing The Space
Start by cleaning the shower walls and floor. Remove any soap scum, dirt, or mold. This prevents damage to the new doors.
Clear the area of personal items, towels, and bath mats. You need enough room to work freely and safely.
- Use a mild cleaner and sponge for walls and floor
- Rinse thoroughly to remove cleaning residue
- Dry all surfaces to prevent slipping
- Remove all loose objects from the shower space
Removing Old Doors Or Curtains
Take off old shower doors carefully to avoid damage. If you have a shower curtain, remove the rod and curtain.
Check for leftover screws, nails, or adhesive. Clean these spots well before installing new doors.
- Unscrew or unclip old doors slowly
- Remove curtain rods by loosening brackets
- Scrape off old caulk or glue with a putty knife
- Clean any marks or holes on walls
Installing The Track System
Installing sliding shower doors starts with setting the track system. The track holds the doors and lets them slide smoothly.
This guide explains how to mark and drill holes and secure the top and bottom tracks properly.
Marking And Drilling Holes
Begin by positioning the track on the shower opening. Use a pencil to mark where the holes will be drilled.
Make sure the marks are level and evenly spaced. This will keep the track straight and stable.
- Use a level to check horizontal alignment
- Mark hole positions clearly with a pencil
- Double-check measurements before drilling
- Use a drill bit suitable for tile or wall material
- Drill holes carefully at marked spots
Securing The Top And Bottom Tracks
After drilling, place the top track and secure it with screws. Tighten the screws until the track is firm but avoid over-tightening.
Next, install the bottom track in the same way. Check that both tracks are aligned and secure before moving on.
- Insert anchors if needed for extra support
- Screw the tracks firmly to the wall or frame
- Ensure tracks are parallel and level
- Test the tracks by sliding the door gently
Hanging The Sliding Doors
Hanging sliding shower doors is a key part of installation. It needs care and some tools. Follow these steps to hang the doors properly.
This guide covers attaching rollers, placing doors on tracks, and adjusting alignment. These steps help the doors slide smoothly and fit well.
Attaching Rollers To Doors
Rollers allow the shower doors to slide easily. Start by finding the roller parts in your kit. Each door usually has two or more rollers.
Use a screwdriver to attach the rollers to the top edge of the doors. Make sure the screws are tight but do not over-tighten. The rollers should move freely.
- Locate roller holes on the door frame
- Insert rollers into the holes
- Tighten screws to secure rollers
- Check roller movement by turning them
Placing Doors On Tracks
After attaching rollers, place the doors on the tracks. The bottom edge of each door fits into the lower track. The rollers rest on the upper track.
Lift the door slightly and angle the top rollers onto the upper track. Then lower the door so it sits firmly on the bottom track. Do this for each door.
- Lift door and align bottom edge with bottom track
- Angle top rollers onto upper track
- Lower door to sit firmly on bottom track
- Check that doors slide smoothly
Adjusting Door Alignment
Doors must be straight and aligned to slide well. Use the adjustment screws on the rollers to move doors up or down. This fixes uneven gaps.
Test the door movement after each adjustment. The doors should not hit the frame or each other. Adjust until the doors slide smoothly and close tightly.
- Turn adjustment screws to raise or lower doors
- Check door alignment and gaps
- Slide doors to test smoothness
- Repeat adjustments as needed

Credit: www.deltashowerdoors.com
Sealing And Finishing Touches
After installing sliding shower doors, sealing and finishing touches are important. These steps keep water inside the shower and protect the bathroom.
Proper sealing also helps your doors last longer and look neat. Let’s explore the key finishing steps.
Applying Waterproof Sealant
Apply waterproof sealant along the edges where the shower doors meet the wall and base. This prevents water leaks and damage.
Use a sealant made for bathrooms. Smooth the sealant with a wet finger or tool for a clean look.
- Clean the area before applying sealant
- Apply a steady bead along joints and seams
- Smooth the sealant evenly for good coverage
- Let it dry fully as per product instructions
Installing Handles And Accessories
Attach handles to the sliding doors for easy use. Some doors come with included handles or knobs.
Make sure to tighten screws firmly but avoid overtightening. You can also add accessories like towel bars if your door supports them.
- Align handles with pre-drilled holes
- Use the right tools for screws
- Check that handles sit flush and secure
- Add any extra accessories carefully
Testing Door Operation
Slide the doors back and forth to test smooth operation. Check for any sticking or noise.
Adjust rollers or tracks if doors do not move easily. Make sure doors close fully and seal well.
- Open and close doors slowly to check movement
- Listen for scraping or grinding sounds
- Adjust track height or roller tension if needed
- Ensure doors stay in place when closed
Maintenance Tips For Longevity
Sliding shower doors need regular care to work well for many years. Good maintenance keeps them clean and smooth.
Simple habits help avoid damage and costly repairs. Follow these tips to extend your door’s life.
Cleaning And Care Instructions
Clean sliding shower doors weekly to stop soap scum and hard water spots. Use mild cleaners and soft cloths to protect glass and metal.
Dry the doors after each shower to prevent mold and rust. Check seals and tracks for dirt or buildup often.
- Use a non-abrasive glass cleaner or vinegar solution
- Wipe metal frames with a damp cloth and dry well
- Clean tracks with a small brush or vacuum
- Remove and clean rollers if possible
- Apply silicone lubricant to moving parts for smooth sliding
Troubleshooting Common Issues
Sliding doors may stick, jump tracks, or leak water. Fixing small problems early keeps doors working well.
Check these common issues and solutions to help your door slide smoothly and stay watertight.
- Door sticks or slides unevenly:Clean tracks and rollers. Lubricate moving parts.
- Door jumps off track:Inspect rollers for damage. Tighten loose screws.
- Water leaks:Replace worn or damaged seals. Check door alignment.
- Noise when sliding:Clean tracks and apply lubricant.
- Glass fogs up:Improve bathroom ventilation.

Credit: acedecorbath.com

Credit: www.deltashowerdoors.com
Frequently Asked Questions
What Tools Are Needed For Installing Sliding Shower Doors?
You need a drill, screwdriver, measuring tape, level, silicone sealant, and safety goggles. These tools ensure precise and safe installation.
How Long Does It Take To Install Sliding Shower Doors?
Installation typically takes 2 to 4 hours, depending on door size and experience. Proper preparation speeds up the process.
Can I Install Sliding Shower Doors Myself?
Yes, with basic DIY skills and the right tools, you can install sliding shower doors. Follow instructions carefully for best results.
How Do I Maintain Sliding Shower Doors After Installation?
Clean tracks regularly and lubricate rollers to keep doors sliding smoothly. Use mild cleaners to avoid damage.
Conclusion
Sliding shower doors enhance any bathroom’s look and function. The installation process is simple and straightforward. With the right tools, you can do it yourself. Enjoy a sleek, modern finish that adds value to your home. Remember to measure accurately for a perfect fit.
Keep the glass clean for lasting shine and clarity. Safety is key, so handle materials with care. With patience and effort, your bathroom will transform beautifully. Enjoy your new sliding shower doors and the fresh appeal they bring.

