19 min read
Are you tired of a cluttered bathroom counter that makes it hard to find your essentials? A simple bathroom tray could be the perfect solution to organize your space and add a touch of style.
Imagine having a beautiful, personalized tray that holds your favorite toiletries, perfumes, and accessories neatly in one place. You’ll discover easy and creative DIY bathroom tray ideas that you can make yourself. These ideas will not only save you money but also give your bathroom a fresh, unique look.
Keep reading to find the perfect project that fits your style and needs!

Credit: www.goodhousekeeping.com
Materials Needed
Making a bathroom tray at home is simple. You only need a few basic materials. These materials help you build a strong and pretty tray.
Choosing the right materials makes the project easier. It also helps your tray last longer in the bathroom environment.
Wood Options
Wood is the main part of your bathroom tray. Pick wood that resists water and looks good. Softwoods are easy to cut, but hardwoods are stronger.
- Cedar – naturally water-resistant and smells nice
- Bamboo – eco-friendly and strong
- Teak – very durable and good for wet places
- Pine – easy to find and work with
Paints And Finishes
Paints and finishes protect your tray from water damage. They also make your tray look nice. Use finishes that are safe for humid areas.
- Water-based polyurethane – clear and protects wood well
- Outdoor paint – adds color and shields wood
- Wood stain – shows wood grain and adds color
- Marine varnish – strong and made for wet conditions
Hardware And Accessories
Hardware makes your tray easier to use and carry. Choose rust-resistant items to avoid damage from moisture.
- Handles – metal or wood for easy carrying
- Screws – stainless steel to avoid rust
- Rubber feet – keep the tray stable on surfaces
- Decorative knobs – add style and function

Credit: www.youtube.com
Simple Wooden Tray
A wooden tray is a useful and attractive item for your bathroom. You can make one yourself with simple tools.
This project uses basic wood pieces and easy steps. You will create a sturdy tray that holds your bathroom items neatly.
Cutting And Sanding
Start by cutting wood boards to the right size. Use a saw to make straight cuts for the base and sides.
After cutting, sand each piece smoothly. Sanding removes rough edges and splinters for safe handling.
- Cut base board to your desired tray size
- Cut four side pieces for tray edges
- Use medium-grit sandpaper on all pieces
- Finish with fine-grit sandpaper for smoothness
Assembling The Base
Lay the base flat on your workspace. Attach the side pieces around the base edges to form a frame.
Use wood glue or nails to fix the sides. Make sure all corners meet tightly for a strong tray.
- Place base board on a flat surface
- Apply glue to side edges
- Attach sides to base carefully
- Clamp or nail sides until dry
Adding Handles
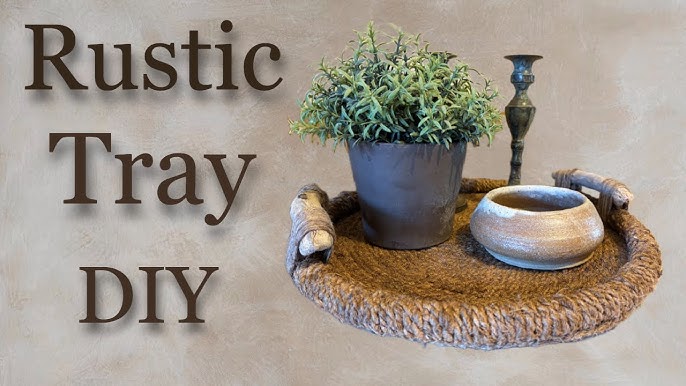
Choose handles that fit your tray style. You can use metal, rope, or wooden handles for easy carrying.
Attach handles on opposite sides. Secure them with screws or strong glue to hold weight safely.
- Mark handle positions on tray sides
- Drill holes if using screw handles
- Fix handles firmly in place
- Test handles for strength before use
Painted Decorative Trays
Painted decorative trays add a personal touch to your bathroom. They keep items organized and look stylish.
Making your own tray lets you choose colors and designs that fit your space perfectly.
Choosing Colors
Pick colors that match your bathroom theme. Soft pastels create a calm feel. Bright colors add energy.
Use colors that blend well with your towels, walls, or accessories for a neat look.
- Light blue or green for a fresh vibe
- White or beige for a clean look
- Bold red or yellow for a pop of color
Stenciling Designs
Stenciling adds patterns to your tray. It makes the design unique and eye-catching.
Choose simple shapes like flowers, stripes, or dots for an easy start.
- Use painter’s tape to hold stencils in place
- Apply paint lightly to avoid bleeding
- Try layering colors for depth
Sealing For Durability
Seal your painted tray to protect it from water and wear. This keeps it looking good longer.
Choose a clear sealant that suits your paint type. Apply two thin coats for best results.
- Use waterproof sealant for bathroom use
- Let each coat dry fully before next
- Avoid heavy sanding after sealing
Resin Coated Trays
Resin coated trays are a great DIY project for your bathroom. They add style and protect the tray surface.
Using resin allows you to create a smooth, shiny finish that lasts long and is easy to clean.
Preparing The Surface
Start by cleaning the tray well to remove dirt and dust. Make sure the surface is dry before you begin.
If the tray has a rough surface, sand it lightly to make it smooth. Wipe away any sanding dust with a cloth.
- Clean with soap and water
- Dry the surface fully
- Sand rough areas gently
- Remove dust using a damp cloth
Mixing And Pouring Resin
Follow the instructions on your resin package carefully. Mix resin and hardener in the right ratio.
Pour the mixed resin slowly onto the tray. Use a stick to spread the resin evenly across the surface.
- Mix resin and hardener well
- Pour resin slowly to avoid bubbles
- Spread resin with a stick or brush
- Work in a dust-free area
Adding Decorative Elements
You can add items like dried flowers, glitter, or small stones before the resin hardens. Place them gently on the resin.
After adding decorations, pour a thin layer of resin on top to seal them in. This keeps the tray smooth and shiny.
- Use dried flowers or leaves
- Add glitter for sparkle
- Place small stones or beads
- Seal decorations with a resin top layer
Repurposed Materials
Using repurposed materials is a smart way to create unique bathroom trays. It saves money and helps the environment.
You can turn old or unused items into functional trays. These ideas add charm and personality to your bathroom.
Using Old Picture Frames
Old picture frames make great bases for bathroom trays. You can remove the glass or keep it to protect the tray surface.
Paint the frame or leave it natural. Add a bottom layer with fabric, cork, or decorative paper for a fresh look.
- Choose a frame size that fits your bathroom items
- Secure a flat bottom inside the frame
- Add handles on the sides for easy carrying
Upcycling Wooden Crates
Wooden crates are sturdy and perfect for making bathroom trays. Sand down rough edges to avoid splinters.
Paint or stain the crate to match your bathroom style. Attach small feet or wheels for added function and style.
- Choose a crate with a flat base and solid sides
- Use waterproof sealant for protection from moisture
- Add dividers for organizing small items
Incorporating Tiles Or Mosaics
Tiles or mosaics add color and texture to bathroom trays. Use broken tiles or leftover pieces to create patterns.
Glue tiles onto a wooden or metal base. Seal the surface to keep it smooth and water-resistant.
- Select tiles that match your bathroom colors
- Arrange pieces before gluing to find the best design
- Use grout to fill gaps and create a polished look

Credit: www.extraspace.com
Functional Enhancements
Bathroom trays can be simple or smart. Adding small changes can make them more useful. These changes help keep things neat and easy to find.
Try simple DIY ideas to improve your tray. This will help you organize your bathroom better.
Adding Compartments
Compartments divide the tray into sections. They keep items separate and easy to reach. You can add small boxes or dividers made of wood or plastic.
Use compartments for different items like toothbrushes, soaps, and lotions. This stops clutter and saves space.
- Use small containers or jars as compartments
- Cut cardboard or wood to create dividers
- Label sections for quick access
- Adjust compartments for different item sizes
Incorporating Non-slip Pads
Non-slip pads keep the tray from sliding. They add safety and protect your surfaces. You can use rubber pads or adhesive strips under the tray.
These pads also stop items on the tray from moving. This is helpful on wet or smooth bathroom counters.
- Use rubber or silicone pads under the tray
- Stick adhesive strips on the tray bottom
- Choose pads that resist water and soap
- Replace pads when they wear out
Customizing For Storage Needs
Make your tray fit what you store. Adjust size and shape to hold your items well. You can add hooks or small shelves if needed.
Think about what you use daily. Customize the tray to keep those items easy to grab and organized.
- Add hooks for hanging razors or brushes
- Build small shelves for extra storage
- Resize tray to fit your bathroom space
- Use waterproof materials for durability
Maintenance Tips
Keeping your bathroom tray clean and in good shape makes it last longer. Simple care helps avoid damage and keeps it looking nice.
Follow easy steps to clean, protect, and fix your tray. This will save you time and money in the future.
Cleaning Methods
Use gentle cleaners to avoid scratches on your tray. Wipe it regularly to stop dirt build-up.
- Use a soft cloth or sponge
- Mild soap with warm water works well
- Avoid harsh chemicals and bleach
- Dry the tray after cleaning
Protecting From Moisture
Moisture can cause wood trays to warp or crack. Keep your tray dry and away from water as much as possible.
Use sealants or waterproof coatings to guard the surface. Place the tray in a dry spot after use.
- Apply a waterproof sealant yearly
- Wipe spills immediately
- Do not leave the tray in standing water
- Use coasters for wet bottles
Repairing Minor Damages
Fix small scratches or cracks early to prevent bigger problems. Use simple tools and materials for repairs.
Light sanding and touch-up paint can restore the tray’s look. Fill cracks with wood filler and let it dry well.
- Sand damaged areas gently
- Use wood filler for cracks
- Apply matching paint or stain
- Seal repaired spots to protect
Frequently Asked Questions
How To Make A Bathroom Tray At Home?
Creating a bathroom tray at home is simple. Start with a wooden base, sand it smooth, and paint it. Add handles on each side for easy lifting. You can personalize it with decorative elements like stencils or decals. Seal with a waterproof finish to protect against moisture.
What Materials Are Best For Bathroom Trays?
The best materials for bathroom trays are wood, acrylic, and metal. Wood offers a natural look and is easily customizable. Acrylic is waterproof and modern. Metal adds an industrial touch and is very durable. Choose based on your bathroom’s decor and personal style preferences.
Can I Use Recycled Materials For A Diy Tray?
Yes, recycled materials are great for DIY trays. Use old wooden planks, leftover tiles, or even wine crates. These materials are eco-friendly and add a unique touch. Ensure all materials are clean and in good condition. Repurposing items can make your tray both sustainable and stylish.
How To Waterproof A Homemade Bathroom Tray?
To waterproof a bathroom tray, apply a clear sealant or varnish. Ensure the tray is clean before application. Use a brush for even coverage. Allow it to dry completely between coats. This protects the tray from moisture damage, extending its lifespan and maintaining its appearance.
Conclusion
Bathroom tray DIY projects add charm and order to your space. Choose materials and designs that fit your style and needs. Simple steps can create a useful, attractive tray. Personal touches make your bathroom feel unique and neat. Small changes bring big improvements to your daily routine.
Try these ideas to brighten and organize your bathroom today. Enjoy crafting and using your new bathroom tray every day.


