


17 min read
Have you ever wondered why some photos instantly catch your eye while others just don’t? The secret often lies in accessory photo styling.
How you arrange and highlight accessories can turn an ordinary shot into something unforgettable. You’ll discover simple yet powerful tips to style accessories in your photos that will grab attention and make your images stand out. Ready to transform your photography and make every detail count?
Keep reading—you won’t want to miss these game-changing ideas.
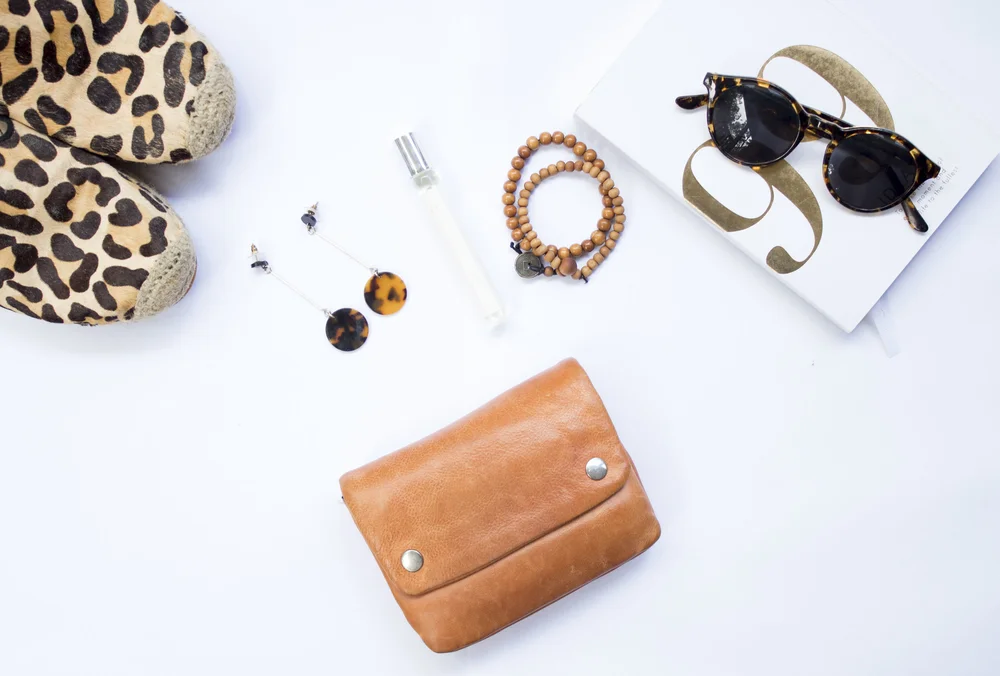
Choosing The Right Accessories
Accessories add style and personality to photos. Picking the right ones makes your images look better.
Good accessory choices help tell a story and keep the focus on your subject.
Matching Accessories To The Theme
Accessories should fit the photo’s main idea or theme. They support the mood and message.
For example, vintage themes need old-fashioned accessories. Modern themes work with sleek, simple items.
- Choose items that tell the same story as the theme
- Avoid mixing styles that clash
- Use props that add to the setting or mood
Considering Color And Texture
Colors and textures in accessories affect how a photo looks. They should blend well with other elements.
Soft textures create calm feelings. Rough textures add interest and depth. Use colors that match or contrast nicely.
- Match accessory colors with clothing or background
- Use texture to add layers and detail
- Avoid colors that distract from the main subject
Balancing Size And Scale
The size of accessories should fit the photo’s setting and subject. Big items can overwhelm small subjects.
Small accessories work well for close-up shots. Large props suit wide shots and open spaces.
- Pick accessories that do not cover the main subject
- Use size to create focus and balance
- Keep scale consistent with the photo’s perspective
Credit: www.loftisproductions.com
Styling Techniques For Impact
Accessory photo styling helps make photos look more interesting. Using good techniques can highlight the accessories clearly.
Simple tricks can change the way accessories appear. This guide focuses on three key techniques for better photos.
Creating Layers And Depth
Adding layers makes your photo look more three-dimensional. Place items at different distances from the camera.
Use foreground and background objects to create depth. This helps the main accessory stand out more.
- Place some accessories closer and others farther
- Use different sizes to show distance
- Overlap items slightly for a natural look
Using Negative Space Effectively
Negative space is the empty area around your accessory. It helps the viewer focus on the main item.
Do not fill every part of the photo. Leaving space makes the photo cleaner and easier to understand.
- Use plain backgrounds with empty areas
- Place the accessory off-center for balance
- Avoid clutter around the main item
Incorporating Movement And Flow
Movement guides the viewer’s eye through the photo. It makes the image more dynamic and interesting.
Arrange accessories in curves or lines. This leads the eye naturally from one item to another.
- Use diagonal lines for energy
- Arrange items in a gentle curve
- Show natural positions like draping or hanging
Lighting And Composition Tips
Good lighting and composition help make accessories look their best. Simple changes can make photos clearer and more attractive.
Using light and arranging shots well can show details and style. These tips will help you improve your accessory photos.
Highlighting Accessories With Light
Light shows the shape and texture of accessories. Use soft light to avoid harsh shadows and bright spots.
Try natural light near a window or use a light diffuser. This spreads light evenly and makes accessories look natural.
- Place accessories near a window for soft sunlight
- Use white cloth or paper to diffuse strong light
- Adjust light angle to highlight details
- Avoid direct flash to prevent glare
Framing Shots For Focus
Framing helps viewers focus on the accessory. Keep the background simple and clean to avoid distractions.
Use the rule of thirds to place the accessory off-center. This makes the photo more interesting and balanced.
- Choose plain backgrounds like white or light colors
- Place the accessory slightly off-center
- Use close-up shots to show details
- Remove clutter around the accessory
Playing With Shadows And Reflections
Shadows and reflections add depth and mood to photos. Use them to create unique looks for accessories.
Place accessories near reflective surfaces or objects that cast soft shadows. Adjust light to control the effect.
- Use mirrors or glass to create reflections
- Place accessories near a light source to cast shadows
- Try side lighting for soft, long shadows
- Watch shadow shapes to keep them neat and clear

Credit: www.shesnotsobasic.com
Common Mistakes To Avoid
Styling accessories in photos needs care to show them well. Avoid mistakes that can ruin the look.
Small errors can distract from the main item. Keep your photos clean and clear for best results.
Overcrowding The Scene
Adding too many items makes the photo busy. Viewers may not know where to look first.
Let your accessory stand out by keeping space around it. Avoid clutter that steals attention.
- Use only a few items in each shot
- Leave empty space to highlight the accessory
- Focus on the main product, not extras
Ignoring Background Elements
Backgrounds that are messy or too bright distract the eye. They can hide the accessory’s details.
Choose simple, clean backgrounds that match the style. Make sure nothing clashes or draws focus.
- Use solid colors or soft textures
- Check for unwanted objects in the frame
- Avoid backgrounds that are too bright or patterned
Using Inappropriate Props
Props should support the accessory, not compete with it. Wrong props confuse the message.
Pick props that fit the style and size of the accessory. Keep them simple and relevant.
- Match props to the accessory’s color and style
- Choose props that add context but stay subtle
- Avoid large or bright props that steal attention
Accessories For Different Photography Styles
Accessories help make photos more interesting and tell a story. Different styles need different accessories to look their best.
Choosing the right accessories can highlight the subject and improve the overall image. Let’s explore how accessories work in various photography styles.
Portrait And Fashion Shoots
Accessories in portrait and fashion shoots add personality and style. They can show a model’s character or enhance the clothing.
Common accessories include hats, jewelry, scarves, and glasses. These items help create different moods and themes for the photos.
- Hats to add flair or mystery
- Jewelry for elegance or edge
- Scarves to add color and texture
- Glasses for a smart or trendy look
Still Life And Product Photography
Accessories in still life and product photos highlight the product’s use or style. They help create a scene that feels real.
Simple items like props, backgrounds, and stands improve the presentation. They keep the focus on the product but add context.
- Small props to show product size
- Textured backgrounds for contrast
- Stands to position products well
- Lighting accessories to reduce shadows
Lifestyle And Environmental Shots
Accessories in lifestyle photos make scenes feel natural and lived-in. They show how people use objects in daily life.
Common accessories include furniture, plants, books, and tools. These items add depth and tell a story about the subject’s environment.
- Furniture to create cozy spaces
- Plants for a fresh, natural look
- Books to show interests or hobbies
- Tools or gadgets for activity scenes
Diy And Budget-friendly Accessory Ideas
Styling accessories can make your photos stand out without spending much. You can create unique looks using simple, low-cost ideas.
Try different materials and methods to add charm to your photos. It is fun and saves money at the same time.
Repurposing Everyday Items
Look around your home for items that can become photo accessories. Old jewelry, fabric scraps, or even kitchen tools can add style.
These items often have unique shapes or textures that make photos more interesting. Use what you already have to save money.
- Turn old scarves into headbands or wraps
- Use buttons and beads to decorate plain props
- Change old sunglasses into cool photo props
- Make bracelets from leftover strings or cords
Crafting Unique Props
Make your own props to add a personal touch to photos. Simple crafts can create fun and creative accessories.
Use paper, fabric, or recycled materials. Cut, paint, or glue pieces to make shapes and designs that fit your style.
- Create paper flowers for colorful accents
- Build small frames or signs from cardboard
- Paint wooden sticks for natural-looking props
- Sew simple fabric pouches or banners
Sourcing Affordable Materials
Find low-cost materials at thrift stores, dollar shops, or craft sales. These places have many items you can use for styling.
Look for fabrics, beads, ribbons, and small decorations. Buying in small amounts helps keep your budget low.
- Check thrift shops for scarves and jewelry
- Buy fabric remnants from craft stores
- Look for discounted art supplies
- Use natural items like leaves and twigs

Credit: www.freepik.com
Frequently Asked Questions
What Is Accessory Photo Styling?
Accessory photo styling involves arranging accessories to enhance visual appeal in photos. It highlights the uniqueness and features of each item. This practice is essential for creating attractive images that captivate audiences. It is often used in fashion photography and product marketing.
How Do I Style Accessories For Photos?
To style accessories, start by selecting a complementary background. Arrange items to create balance and symmetry. Use natural light to highlight details. Experiment with angles to find the most flattering shot. Keep the focus on the accessories to ensure they stand out.
Why Is Accessory Photo Styling Important?
Accessory photo styling boosts visual appeal and attracts viewers’ attention. It enhances the overall aesthetic of images, making products more desirable. Effective styling can increase engagement and sales by showcasing accessories in the best light. It is vital for brand image and marketing strategies.
What Tools Help In Accessory Photo Styling?
Key tools include a high-quality camera, natural light, and a clean background. Use props like stands or holders to add dimension. Editing software can enhance colors and textures. Reflectors can help manipulate light for better visuals. These tools collectively improve the final image quality.
Conclusion
Accessory photo styling adds charm and interest to your images. It helps tell a story without many words. Choose items that match your theme and keep things simple. Small details can catch the viewer’s eye and make photos stand out.
Practice arranging accessories in different ways to find what looks best. Good styling makes photos feel natural and inviting. Keep learning and experimenting to improve your skills. Great photos start with thoughtful, clear styling choices.

