

16 min read
Are you looking to add a bidet suit to your custom toilet but aren’t sure where to start? Installing a bidet suit can transform your bathroom experience, making it cleaner and more comfortable.
But without the right guidance, the process might feel confusing or overwhelming. This article will walk you through everything you need to know to install your bidet suit easily and correctly. By the end, you’ll feel confident about upgrading your custom toilet and enjoying all the benefits it brings.
Keep reading to discover simple steps and expert tips that will make your installation smooth and hassle-free.

Credit: www.amazon.com
Choosing The Right Bidet Suit
Installing a bidet suit for custom toilets needs careful thought. The right choice makes your bathroom more comfortable and functional.
Consider the type, compatibility, and material of the bidet suit. These factors ensure the best fit and long-lasting use.
Types Of Bidet Suits
Bidet suits come in different styles. Each style offers unique features and benefits for your toilet.
- Handheld bidet sprayers offer manual control and easy use.
- Non-electric bidet seats provide warm water without power.
- Electric bidet seats include advanced options like heated seats and dryers.
- Attachment bidets fit under your existing toilet seat for a quick upgrade.
Compatibility With Custom Toilets
Not all bidet suits fit every custom toilet. Check the toilet’s shape and size before buying.
Round and elongated toilet bowls need different bidet suits. Also, verify the mounting points and water connections.
- Measure the length and width of your toilet bowl.
- Check if the bidet suit matches your toilet’s shape.
- Confirm water supply line compatibility.
- Consider seat height and clearance space.
Material And Durability
Bidet suits are made from different materials. The material affects comfort and how long the product lasts.
Look for strong materials that resist cracks and stains. Easy-to-clean surfaces keep your bathroom fresh.
- ABS plastic is lightweight and durable.
- Stainless steel parts resist rust and corrosion.
- Soft-close seats prevent loud noises and damage.
- Quality materials improve overall hygiene.
Preparing For Installation
Installing a bidet suit on a custom toilet needs some careful preparation. Getting ready helps the installation go smoothly.
Before starting, check your tools, measure your toilet, and confirm the water supply is ready.
Tools And Materials Needed
Gather all tools and materials before you begin. This saves time and avoids interruptions.
- Adjustable wrench
- Screwdriver (flat and Phillips)
- Teflon tape
- Bucket or small container
- Cleaning cloth
- Bidet suit installation kit
- Plumber’s tape or sealant
Measuring Your Toilet
Measure your toilet to make sure the bidet suit fits properly. Check the seat size and mounting holes.
- Measure the width of the toilet seat
- Measure the length from the front to the mounting holes
- Check the distance between mounting holes
- Note the shape of the seat (round or elongated)
Checking Water Supply
Ensure the water supply is close to the toilet. Turn off the water before starting the installation.
Look for the shut-off valve and inspect the water hose for leaks or damage.
- Locate the nearest water shut-off valve
- Turn off the water supply
- Prepare a towel or bucket for water spills
- Check the hose connection for tightness
Step-by-step Installation
Installing a bidet suit on a custom toilet can be simple. Follow these steps carefully to ensure proper setup.
This guide covers removing the old seat, attaching the bidet suit, connecting water lines, and checking for leaks.
Removing Existing Toilet Seat
Start by lifting the toilet seat lid. Find the bolts that hold the seat in place at the back.
Use a wrench or screwdriver to loosen the bolts. Remove the seat and clean the area before attaching the new bidet suit.
Attaching The Bidet Suit
Place the bidet suit on the toilet bowl. Align the holes on the bidet with the bolt holes on the toilet.
Insert the bolts through the holes and tighten them securely. Make sure the bidet suit is stable and does not move.
Connecting Water Lines
Turn off the main water supply before starting. Locate the water supply line near the toilet.
Disconnect the existing hose and connect the bidet’s water hose. Use Teflon tape on threads to prevent leaks.
- Attach hose from water supply to bidet adapter
- Connect bidet hose from adapter to bidet suit
- Check that all connections are tight
Testing For Leaks
Turn the water supply back on slowly. Watch all connection points for drips or leaks.
If you see water leaking, tighten the connections or add more Teflon tape. Test the bidet functions to confirm water flows correctly.
Adjusting Settings And Features
Installing a bidet suit for custom toilets lets you enjoy better hygiene. Adjusting the settings helps you get the best comfort and use.
Each feature can be changed easily to fit your needs. Learn how to control water pressure, temperature, and nozzle position.
Water Pressure Control
You can change the water pressure to feel just right. Too strong or too weak pressure might be uncomfortable.
Most bidet suits have buttons or dials to increase or decrease pressure. Start with low pressure and adjust slowly.
- Low pressure for sensitive skin
- Medium pressure for everyday use
- High pressure for a stronger clean
Temperature Settings
Temperature control lets you warm the water for comfort. Cold water can be shocking, especially in winter.
Adjust the temperature using the bidet’s control panel. Choose a warm or cool setting that suits you best.
- Warm water helps relax muscles
- Cool water refreshes quickly
- Always test water temperature before use
Nozzle Positioning
Nozzle position controls where the water sprays. Proper positioning improves cleaning and comfort.
Use the remote or buttons to move the nozzle forward, backward, or side to side. Adjust slowly to find the best spot.
- Forward position for thorough cleaning
- Backward position for gentle wash
- Side to side for wider coverage
Maintenance And Troubleshooting
Maintaining your bidet suit for custom toilets keeps it working well. Regular care prevents problems and extends its life.
Troubleshooting helps fix small issues quickly. Knowing when to clean or fix saves time and money.
Cleaning The Bidet Suit
Clean the bidet suit often to stop dirt and germs. Use mild soap and a soft cloth for cleaning.
Avoid harsh chemicals that can damage the surface or parts. Rinse well and dry after cleaning.
- Turn off water supply before cleaning
- Wipe nozzle gently to avoid damage
- Clean filter screens monthly
- Check for any leaks during cleaning
Fixing Common Issues
If the bidet suit does not spray water, check the water supply. Make sure valves are open and hoses are connected.
For weak water pressure, clean the nozzles or filters. Replace parts if they are worn out or blocked.
- No water flow: Check water valves and connections
- Low pressure: Clean or replace clogged nozzles
- Water leaks: Tighten fittings and replace seals
- Electric issues: Inspect power supply and cords
When To Call A Professional
Call a professional if water leaks persist after tightening. Also seek help for electrical problems or broken parts.
Experts can fix complex issues safely. They also handle installation or replacement of bidet suits.
- Persistent leaks
- Electric malfunctions
- Damaged or broken components
- Installation or major repairs

Credit: www.amazon.ca
Enhancing Your Bathroom Experience
Installing a bidet suit for custom toilets can improve your bathroom comfort. It offers better hygiene and a fresh feeling after each use.
Bidet suits fit well with custom toilets, making your bathroom look neat and modern. They add useful features to your daily routine.
Adding Accessories
You can add many accessories to your bidet suit. These accessories increase comfort and functionality.
Common accessories include heated seats, adjustable water pressure, and air dryers. These make your bathroom time more pleasant.
- Heated seats for warmth during cold days
- Adjustable water pressure for personal comfort
- Air dryers to reduce toilet paper use
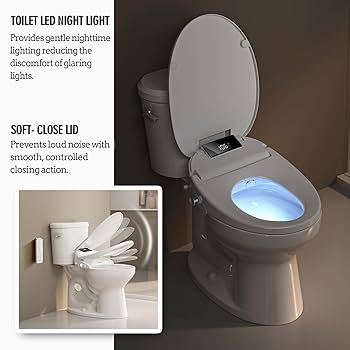
- Night lights for easy use in the dark
Energy Efficiency Tips
Saving energy while using a bidet suit is easy. Choose models with energy-saving modes to reduce power use.
Turn off features like seat heating when not needed. This helps lower your electricity bills and saves the environment.
- Use energy-saving mode if available
- Turn off heated seats when leaving home
- Select models with low power consumption
- Regularly check for leaks to avoid water waste
Customizing For Comfort
Personalize your bidet suit to fit your needs. Adjust water temperature, nozzle position, and spray type for comfort.
Custom settings help everyone in the house enjoy the best experience. Some bidets store preferences for multiple users.
- Set water temperature to your liking
- Adjust nozzle position for better reach
- Choose spray types: gentle, pulsating, or massage
- Save settings for different users

Credit: www.amazon.ca
Frequently Asked Questions
What Tools Are Needed For Bidet Suit Installation?
You need a wrench, screwdriver, Teflon tape, and a bidet installation kit. Make sure to turn off the water supply before starting.
How To Install A Bidet Suit On Custom Toilets?
First, remove the existing toilet seat. Align the bidet suit with mounting holes. Secure it using screws and connect the water supply.
Can I Install A Bidet Suit Myself?
Yes, most bidet suits are DIY-friendly. Follow instructions carefully and ensure proper water connection to avoid leaks.
How Long Does Bidet Suit Installation Take?
Installation usually takes 30 to 60 minutes, depending on your plumbing skills and toilet type.
Conclusion
Installing a bidet suit on custom toilets is a smart choice. It enhances hygiene and comfort in your bathroom. The process is simple and worth the effort. A bidet can save money on toilet paper. It’s an eco-friendly option too.
Many designs fit any bathroom style. Choose the one that suits your needs best. Enjoy a clean and refreshing experience every day. Investing in a bidet is a step towards better personal care. Transform your bathroom into a modern, efficient space.
Stay clean and comfortable with ease.

