

19 min read
Is that constant drip-drip from your bathroom tap driving you crazy? Not only is it annoying, but it can also waste a surprising amount of water and hike up your bills.
The good news is, you don’t have to call a plumber right away. You can fix that dripping tap yourself, even if you’re not a DIY expert. In this guide, you’ll discover simple, step-by-step tips to stop the leak quickly and save money.
Ready to take control and silence that drip once and for all? Keep reading—you’re closer to a peaceful, leak-free bathroom than you think.
Common Causes Of Tap Leaks
A dripping bathroom tap wastes water and can be annoying. Many leaks come from small worn parts inside the tap.
Knowing the common causes helps you fix the problem quickly. Most leaks come from washers, O-rings, or valve seats.
Worn Out Washers
Washers are small rubber parts inside the tap. They press against the valve to stop water flow when off.
Over time, washers get hard or cracked. This causes water to leak around them and drip from the tap.
- Washers wear out from constant use
- Hard water can make washers brittle
- Replacing washers often stops leaks
Damaged O-rings
O-rings are small seals around the tap stem. They stop water from leaking where the handle turns.
If an O-ring cracks or breaks, water can drip near the handle. This leak can waste water and cause damage.
- O-rings can dry out over time
- They may crack from heat or age
- Replacing O-rings fixes leaks around handles
Corroded Valve Seats
The valve seat connects the tap body to the washer. It helps stop water flow when the tap is closed.
Corrosion or dirt can damage the valve seat. This stops the washer from sealing well and causes dripping.
- Hard water causes valve seat corrosion
- Dirt buildup can roughen the seat surface
- Smoothing or replacing valve seats stops leaks

Credit: www.youtube.com
Tools And Materials Needed
Fixing a dripping bathroom tap requires some basic tools and parts. Having the right items makes the job easier.
This guide covers the main tools, replacement parts, and safety gear you need.
Basic Plumbing Tools
You need simple plumbing tools to open the tap and replace parts. Most of these tools are common in home toolkits.
- Adjustable wrench to loosen nuts
- Screwdrivers (flathead and Phillips)
- Pliers for gripping small parts
- Allen keys for certain tap models
- Pipe tape to seal threaded joints
- Bucket to catch water drips
- Cleaning cloth to wipe parts
Replacement Parts
Dripping taps usually need worn parts replaced. Carry the right spares to fix the leak quickly.
- Washers that fit your tap size
- O-rings to seal joints
- Tap cartridge for mixer taps
- Valve seat if it is damaged
- New screws if old ones are rusty
Safety Gear
Protect yourself by wearing simple safety gear. It helps prevent injuries when working with tools and water.
- Rubber gloves to keep hands dry
- Safety glasses to protect eyes from splashes
- Kneepads if you work on the floor
- Old clothes to avoid stains
Shutting Off Water Supply
Fixing a dripping bathroom tap starts with stopping the water. This prevents water damage and mess.
Turning off the water supply is important before you begin any repairs. It keeps you safe and dry.
Locate Main Valve
Find the main water valve in your home. It controls all water flow to the house.
Main valves are often near the water meter, basement, or outside walls. Look for a round or lever handle.
- Check near your water meter
- Look in the basement or utility room
- Search outside near the foundation
- Identify the valve handle type
Drain Remaining Water
After closing the valve, open the tap to drain leftover water. This clears pipes for repair.
Draining helps stop drips and prevents water from spilling while fixing the tap.
- Open the dripping tap fully
- Let water flow out until it stops
- Close the tap before starting work
Credit: www.youtube.com
Removing The Tap Handle
Fixing a dripping bathroom tap often starts by removing the tap handle. This lets you access the inner parts that cause leaks.
Removing the handle is simple if you know the right steps. It helps to identify the handle type first.
Identify Handle Type
Bathroom taps have different handle types. Some handles have visible screws, others hide them.
Common types include lever handles, cross handles, and knob handles. Each needs a different removal method.
- Lever handles: Usually have a small cap hiding the screw
- Cross handles: Often have a screw under the top or center
- Knob handles: May have a hidden screw or need to be pulled off
Unscrew Handle Safely
Find the screw that holds the handle. It may be under a cap or visible on the side.
Use the right screwdriver to avoid stripping the screw. Turn it slowly and carefully.
- Remove any decorative caps gently with a flat tool
- Use a Phillips or flathead screwdriver as needed
- Keep the screws safe for reassembly
- If the handle is stuck, use a handle puller or apply gentle force
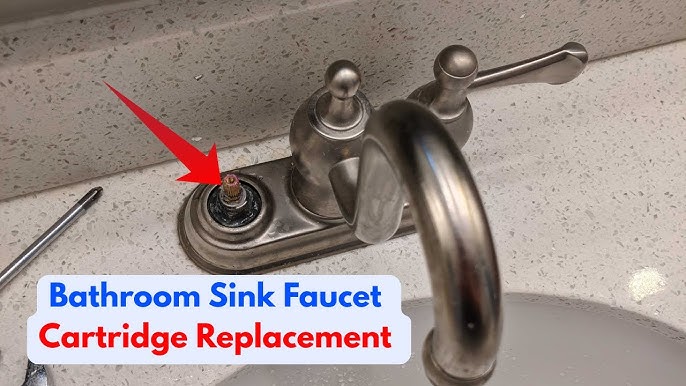
Inspecting Internal Components
Fixing a dripping bathroom tap starts by looking inside the tap. You need to check the parts that control water flow.
Careful inspection helps find worn or broken pieces causing the drip. This guide shows how to inspect key parts.
Check Washers And O-rings
Washers and O-rings stop water from leaking inside the tap. They sit around the valve and handle parts.
Look for cracks, hardening, or flat spots. Replace any washer or O-ring that looks damaged or worn out.
- Remove the tap handle to access washers and O-rings
- Check if the washers are soft and round
- Inspect O-rings for tears or stiffness
- Replace parts that look old or broken
Examine Valve Seat Condition
The valve seat connects the tap body to the washer. It must be smooth and clean for a tight seal.
Look for corrosion, scratches, or mineral buildup on the valve seat. Clean or replace if needed to stop leaks.
- Use a flashlight to see the valve seat clearly
- Clean the seat with a cloth or fine sandpaper
- Replace the valve seat if it is deeply damaged
- Test for leaks after cleaning or replacing
Replacing Faulty Parts
A dripping bathroom tap often means parts inside are worn out. Replacing these parts can stop the leak. This guide focuses on changing washers and O-rings.
Fixing these small parts saves water and prevents damage. You only need a few tools and some patience to do the job.
Remove Old Washers And O-rings
Turn off the water supply before starting. Open the tap to drain any leftover water.
Use a wrench to loosen the tap handle. Remove it carefully to access the cartridge or valve.
- Locate the washers and O-rings inside the valve.
- Remove them gently with a screwdriver or pliers.
- Check for damage like cracks or flattening.
- Dispose of old parts properly.
Install New Components Correctly
Choose washers and O-rings that fit your tap model. Clean the area before installing new parts.
Place the new washers and O-rings in the correct spots. Press them firmly but do not force them.
- Lubricate O-rings lightly with plumber’s grease.
- Reassemble the valve and handle carefully.
- Turn on water supply and check for leaks.
- Tighten any loose parts if needed.
Reassembling The Tap
After fixing the internal parts, you need to put the tap back together. Reassembling the tap carefully stops leaks and keeps it working well.
Follow these simple steps to reattach the handle and secure all screws. This will ensure your tap is tight and drip-free.
Reattach Handle
Place the handle back on the tap spindle. Make sure it fits snugly and lines up with the tap body.
Press the handle firmly to push it into place. Check that it moves smoothly without wobbling.
Secure All Screws
Use a screwdriver to tighten all screws on the handle and tap body. Tighten them evenly to avoid damage.
- Start with the handle screws
- Then tighten any screws holding the tap cover
- Check all screws are firm but not over-tightened
Testing For Leaks
Testing for leaks is important to fix a dripping bathroom tap. It helps you find the exact problem.
By checking carefully, you can save water and avoid bigger repairs later.
Turn Water Supply On
First, make sure the water supply to the tap is turned on. This lets water flow through the pipes.
Find the main valve under the sink or near the bathroom. Turn it slowly to open the water flow.
Check For Drips
Look closely at the tap to see if water is dripping. Check the spout and handles for any leaks.
If you see drops forming, note where they come from. This helps you know what part needs fixing.
Preventing Future Leaks
Fixing a dripping bathroom tap is important. Stopping leaks early saves water and money.
Regular care helps keep taps working well. You can avoid many leaks with simple steps.
Regular Maintenance Tips
Check your taps often for small drips or damage. Clean taps to stop dirt build-up.
Replace worn parts like washers and seals quickly. Tighten loose fittings to prevent leaks.
- Inspect taps monthly for signs of wear
- Clean aerators to remove mineral deposits
- Replace washers every 6-12 months
- Tighten handles and connections carefully
- Use gentle cleaning products to avoid damage
When To Call A Professional
Some leaks need expert help. Call a plumber if the drip keeps coming back.
Complex repairs or old pipes may need a professional’s tools and skills.
- Leaks continue after you replace parts
- Water pressure is unusually low or high
- Tap handles are hard to turn
- Signs of water damage under the sink
- You are unsure how to fix the problem safely

Credit: www.bunnings.co.nz
Frequently Asked Questions
How Do I Stop A Bathroom Tap From Dripping?
To stop a dripping tap, first turn off the water supply. Then, replace worn washers or seals inside the tap. Tighten any loose parts and check for damage. If needed, call a plumber for professional help.
What Tools Are Needed To Fix A Dripping Tap?
You need a wrench, screwdriver, replacement washers, and plumber’s grease. Having a cloth to catch drips is helpful. These tools allow you to dismantle the tap, replace faulty parts, and reassemble it properly.
Why Is My Bathroom Tap Dripping Continuously?
A continuous drip usually means worn washers, damaged seals, or mineral buildup. Over time, these parts degrade and cause leaks. Regular maintenance and timely replacement fix the problem and save water.
Can I Fix A Dripping Tap Without A Plumber?
Yes, many dripping taps can be fixed by homeowners. Basic repairs like replacing washers or seals are simple with the right tools. However, complex issues or persistent leaks might require professional assistance.
Conclusion
Fixing a dripping bathroom tap is simple with the right steps. First, gather your tools. Then, turn off the water supply. Next, disassemble the tap carefully. Check washers and O-rings. Replace any worn parts. Reassemble the tap securely. Finally, turn the water on and test for leaks.
A few easy steps can save water and reduce bills. No need for a plumber. Just patience and basic tools. A non-dripping tap helps conserve water. Plus, it keeps your bathroom quiet. Now, enjoy a drip-free bathroom. Feel accomplished and save money.

