19 min read
Imagine upgrading your bathroom comfort without buying a new toilet. You might think adding a bidet means a costly remodel, but it doesn’t have to be that way.
You can easily retrofit a bidet to your existing toilet and enjoy a cleaner, fresher feel every time you go. You’ll discover simple steps to transform your bathroom experience quickly and affordably. Ready to learn how to make your toilet smarter and more hygienic?
Keep reading—you’ll be surprised how easy it is!

Credit: www.manybidets.com
Choosing The Right Bidet Attachment
Adding a bidet attachment to your toilet is a smart way to improve hygiene. Choosing the right attachment makes installation easier and use more comfortable.
Think about the type, compatibility, and features before buying. This guide helps you pick the best option for your toilet.
Types Of Bidet Attachments
There are several types of bidet attachments. Each type fits different needs and budgets.
- Non-electric bidet attachments: Use water pressure only, no electricity needed.
- Electric bidet attachments: Offer heated water and extra features.
- Handheld bidet sprayers: Attach to your toilet’s water supply for manual use.
- Toilet seat bidets: Replace your whole toilet seat with built-in bidet functions.
Compatibility With Toilets
Not all bidet attachments fit every toilet. Check your toilet shape and size first.
Most bidet attachments fit standard two-piece toilets. One-piece and wall-hung toilets need special models.
- Round vs. elongated toilet bowls affect fit and comfort.
- Check the space between the seat bolts and tank.
- Some toilets have unusual shapes needing custom attachments.
Features To Consider
Bidet attachments come with different features. Choose based on your comfort and budget.
- Water temperature control:Heated water adds comfort, especially in cold weather.
- Pressure adjustment:Allows you to control water strength.
- Nozzle type:Single or dual nozzles for front and rear cleaning.
- Self-cleaning nozzles:Stay hygienic with automatic cleaning.
- Easy installation:Look for models with simple setup instructions.

Credit: m.youtube.com
Gathering Tools And Materials
Retrofitting a bidet to your existing toilet is a simple project. Before starting, gather all necessary tools and materials. This preparation helps the installation go smoothly.
You will need some basic tools and parts. Some optional accessories can improve your bidet experience. Let’s look at what you need.
Essential Tools List
These tools are important for installing a bidet attachment. They help you remove the toilet seat and connect water lines safely.
- Adjustable wrench for tightening bolts and fittings
- Screwdriver (flathead and Phillips) to remove the toilet seat
- Teflon tape for sealing water connections
- Towel or small bucket to catch water drips
- Utility knife to trim any packaging or tubing
- Measuring tape to check hose lengths
Optional Accessories
Optional accessories are not required but can make your bidet better or easier to use. Choose what fits your needs and budget.
- Bidet hose extension for longer reach
- Water pressure regulator for gentle spray control
- Mounting brackets for extra support
- Decorative covers to hide plumbing parts
- Cleaning brushes for bidet maintenance
Preparing The Toilet
Before installing a bidet on your existing toilet, you need to prepare the toilet properly. This helps make the installation smooth and safe.
Preparing the toilet involves stopping the water flow and emptying the tank. These steps prevent leaks and water spills.
Turning Off Water Supply
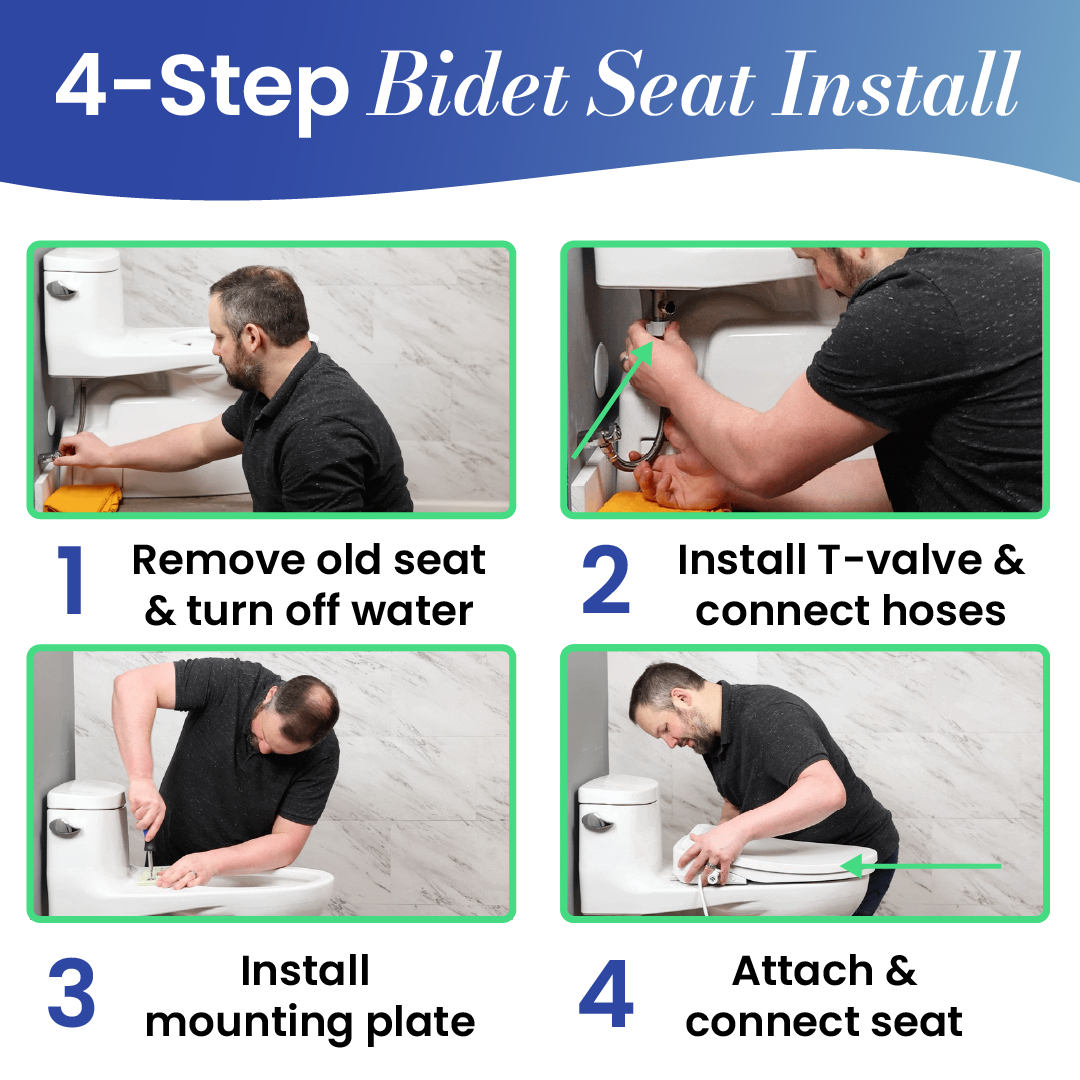
Find the water shut-off valve near the base of your toilet. This valve controls the water supply to the toilet tank.
Turn the valve clockwise until it stops. This shuts off the water to the toilet and stops any new water from entering the tank.
- Locate the shut-off valve behind or beside the toilet
- Use your hand or a wrench to turn the valve clockwise
- Make sure it is fully closed to stop water flow
Emptying The Toilet Tank
Flush the toilet to drain most of the water from the tank. Hold the flush lever down to let the tank empty completely.
If water remains, use a sponge or towel to soak it up. Removing water prevents spills during bidet installation.
- Press the flush lever and keep it down
- Wait for water to drain out of the tank
- Use a sponge to remove leftover water
Removing The Existing Toilet Seat
To retrofit a bidet, you first need to remove the current toilet seat. This makes space for the new bidet attachment.
The process is simple and requires only a few tools. Focus on locating and detaching the seat bolts carefully.
Locating Seat Bolts
Seat bolts hold the toilet seat to the bowl. They are usually at the back of the seat, near the hinges.
Look for two plastic or metal covers. These covers hide the bolts underneath.
- Lift the plastic covers gently to see the bolts.
- Some bolts may be rusted or hard to see.
- Use a flashlight if the area is dark.
Safely Detaching The Seat
Use a wrench or screwdriver to loosen the bolts. Hold the nut underneath to stop it from turning.
Once the bolts are loose, lift the seat off the toilet bowl. Keep the bolts and nuts if you want to reuse them.
- Wear gloves to protect your hands.
- If bolts are stuck, spray some lubricant and wait a few minutes.
- Remove both bolts before lifting the seat.
- Store bolts and nuts safely for future use.
Installing The Bidet Attachment
Adding a bidet attachment to your toilet can improve hygiene and comfort. The process is simple and does not require special tools.
This guide covers how to position and secure the bidet attachment for safe use.
Positioning The Bidet
First, remove the toilet seat by unscrewing the bolts. Place the bidet attachment on the rim of the toilet bowl.
Align the bidet nozzle so it points inside the bowl. Make sure it sits flat and does not block the bolt holes.
- Remove the toilet seat
- Place the bidet attachment on the bowl rim
- Align the nozzle toward the bowl center
- Check that bolt holes remain clear
Securing The Attachment
Put the toilet seat back over the bidet attachment. Line up the holes on the seat and bidet with the toilet’s bolt holes.
Use the original bolts to tighten the seat and bidet together. Make sure everything is snug but not too tight.
- Replace the toilet seat over the bidet
- Align all bolt holes
- Insert and tighten the bolts
- Check for stability and adjust if needed

Credit: everflowbidets.com
Connecting The Water Supply
To retrofit a bidet to your existing toilet, you need to connect it to your water supply. This part is important to make sure your bidet works well and safely. Follow the simple steps below to connect your bidet.
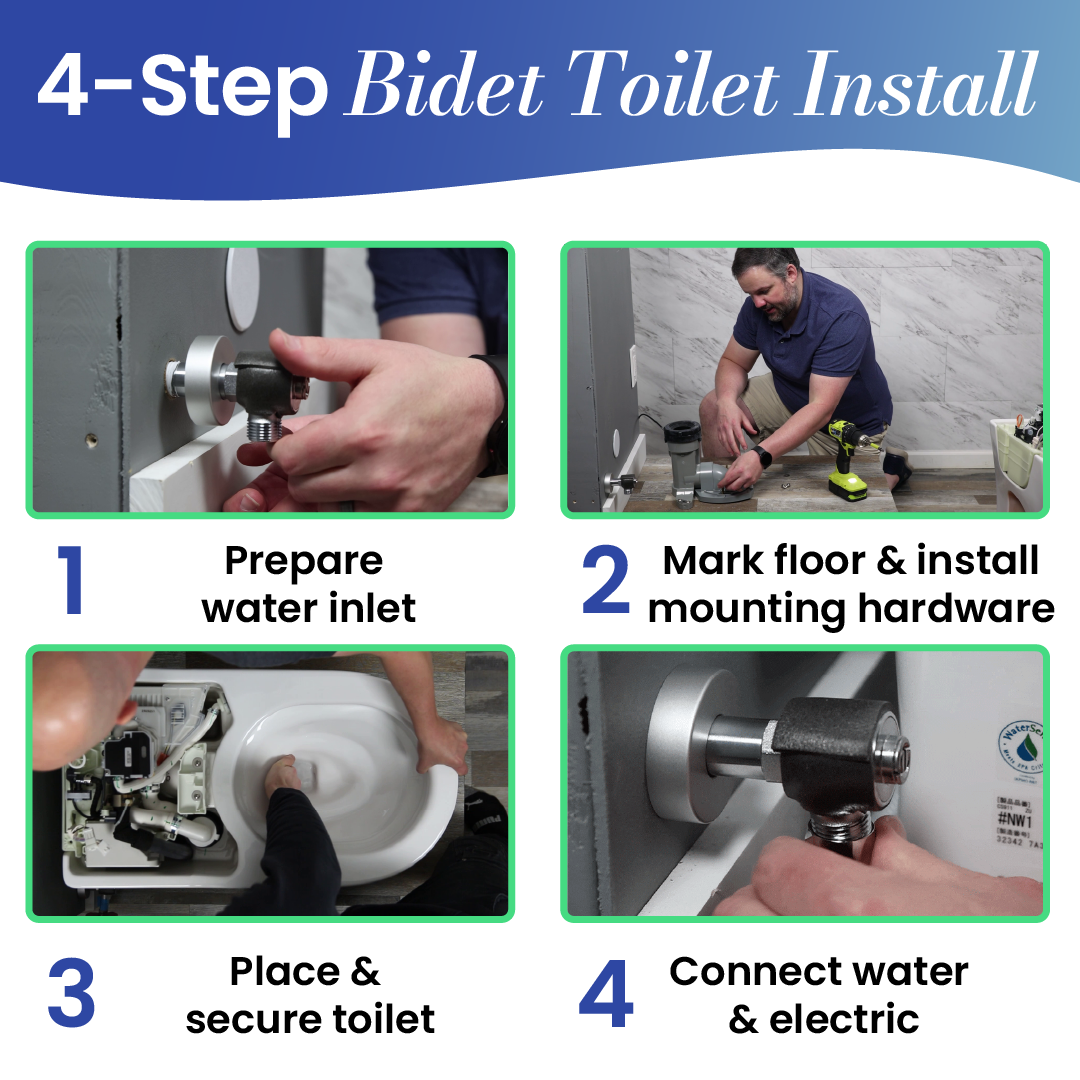
Most bidet attachments connect using a T-valve and a bidet hose. These parts help split the water flow between your toilet and bidet.
Attaching The T-valve
The T-valve is the part that connects to your toilet’s water supply line. It allows water to flow to both the toilet and the bidet. Start by turning off the water supply valve near the toilet.
Next, disconnect the water hose from the toilet tank. Screw the T-valve onto the toilet’s fill valve. Then, reconnect the toilet’s water hose to the bottom of the T-valve. Make sure all connections are tight to avoid leaks.
- Turn off the water supply
- Disconnect the water hose from the toilet tank
- Screw the T-valve onto the fill valve
- Reconnect the toilet hose to the T-valve
- Check for tight connections
Hooking Up The Bidet Hose
Now, connect the bidet hose to the side outlet of the T-valve. The other end of the hose connects to the bidet attachment under the toilet seat.
Make sure the hose is not twisted or bent. Tighten both ends to prevent water leaks. After everything is connected, turn on the water supply and test the bidet for leaks and proper water flow.
- Attach one end of the bidet hose to the T-valve
- Connect the other end to the bidet attachment
- Avoid twisting or bending the hose
- Tighten connections securely
- Turn on water and check for leaks
Testing The Bidet Functionality
After installing a bidet on your existing toilet, testing it is important. This ensures it works safely and properly. You should check the water flow and look for any leaks.
Testing helps you adjust settings for comfort. It also protects your bathroom from water damage. Take your time to test every feature carefully.
Checking For Leaks
First, check all connections where the bidet attaches to the toilet and water supply. Turn on the water slowly and watch for drips. Look under the toilet and near valves.
If you find leaks, tighten the connections with a wrench. Use plumber’s tape on threads to stop leaks. Repeat testing until no water escapes.
- Inspect hose connections
- Check T-valve and adapters
- Look for water pooling around fittings
- Tighten or re-seal any leaking parts
Adjusting Water Pressure
Test the water pressure from the bidet by turning the control knob slowly. Start with low pressure to avoid surprises. Increase until the pressure feels comfortable.
Too much pressure can cause splashing or discomfort. Too little pressure may not clean well. Find a balance that suits your needs.
- Turn knob slowly to control pressure
- Adjust until water flow feels right
- Stop if water sprays too hard
- Repeat test to confirm settings
Maintenance Tips
Keeping your bidet clean and in good shape helps it work well. Proper care saves money and avoids problems.
Follow simple steps to maintain your bidet after installation. This guide covers cleaning and fixing common issues.
Regular Cleaning
Clean your bidet at least once a week. Use mild soap and warm water for all parts.
Avoid strong chemicals that can damage the nozzle or seat. Wipe gently with a soft cloth to prevent scratches.
- Turn off the water supply before cleaning
- Clean the nozzle carefully to remove buildup
- Dry the seat and control panel after cleaning
- Check for leaks or loose parts while cleaning
Troubleshooting Common Issues
If your bidet stops working correctly, first check the water supply. Make sure it is open and connected well.
Look for clogged nozzles or dirt that blocks water flow. Clean the parts gently to fix this issue.
- No water spray: check water valve and nozzle
- Weak water pressure: clean filter or nozzle
- Seat does not heat: check power connection
- Remote or control panel not responding: replace batteries or reset device
Frequently Asked Questions
What Tools Are Needed To Retrofit A Bidet To A Toilet?
You need a wrench, screwdriver, adjustable pliers, and T-valve. These tools help disconnect the water supply and install the bidet easily. Make sure to turn off the water before starting the retrofit process.
How Long Does It Take To Install A Bidet Attachment?
Installing a bidet attachment usually takes 30 to 60 minutes. The time depends on your experience and toilet model. Most bidet kits come with clear instructions to simplify the installation.
Is Professional Help Required For Bidet Retrofitting?
Professional help is not mandatory for most bidet retrofits. If you are comfortable with basic plumbing, you can install it yourself. However, consult a plumber if your toilet has unusual plumbing or if problems arise.
Will Retrofitting A Bidet Affect Toilet Flushing?
Retrofitting a bidet does not affect toilet flushing. The bidet attachment connects to the water supply separately. It operates independently, ensuring normal toilet function without interference.
Conclusion
Retrofitting a bidet is simple and rewarding. It enhances bathroom hygiene. With basic tools, you can install it easily. Follow the steps carefully for best results. Enjoy the comfort a bidet offers. It’s a cost-effective upgrade. Many find it improves personal cleanliness significantly.
Remember to check compatibility with your toilet. A little effort leads to big benefits. Experience the refreshing change today. Feel the difference in your daily routine. Start your journey to better hygiene now. A small change can make a big impact.
Happy retrofitting!


