

21 min read
Have you ever worried about the risk of scalding from hot water in your home or workplace? Installing scald-prevention valves can be the simple solution you need to protect yourself and your loved ones from painful burns.
These valves control water temperature, making sure it stays at a safe level every time you turn on the tap. You’ll discover why these valves are essential, how they work, and the easy steps to install them. By the end, you’ll feel confident about keeping your environment safer and more comfortable for everyone.
Keep reading to learn how a small change can make a big difference in your daily life.
Why Scald-prevention Valves Matter
Scald-prevention valves stop water from getting too hot. They protect people from burns in bathrooms and kitchens.
These valves keep water at a safe temperature. They help families, especially children and older adults, stay safe.
Protecting Children And Elderly
Children and elderly skin burns easily. Scald-prevention valves lower the risk of serious injuries from hot water.
These valves keep water temperature steady. They stop sudden hot water bursts that can cause burns.
Saving Money On Medical Costs
Burns from hot water can lead to costly medical bills. Using scald-prevention valves reduces these risks.
Preventing burns helps avoid doctor visits and medicine expenses. This makes homes safer and cheaper to maintain.
Meeting Safety Standards
Building codes often require scald-prevention valves in homes. Installing them helps meet these safety rules.
Following safety standards protects homeowners from legal issues. It also ensures water temperature stays safe.
Improving Home Comfort
Scald-prevention valves keep water at a steady temperature. This makes showers and baths more comfortable.
They prevent sudden hot water changes that can cause discomfort. This helps everyone in the home enjoy water safely.
Credit: www.commercialwashroomsltd.co.uk
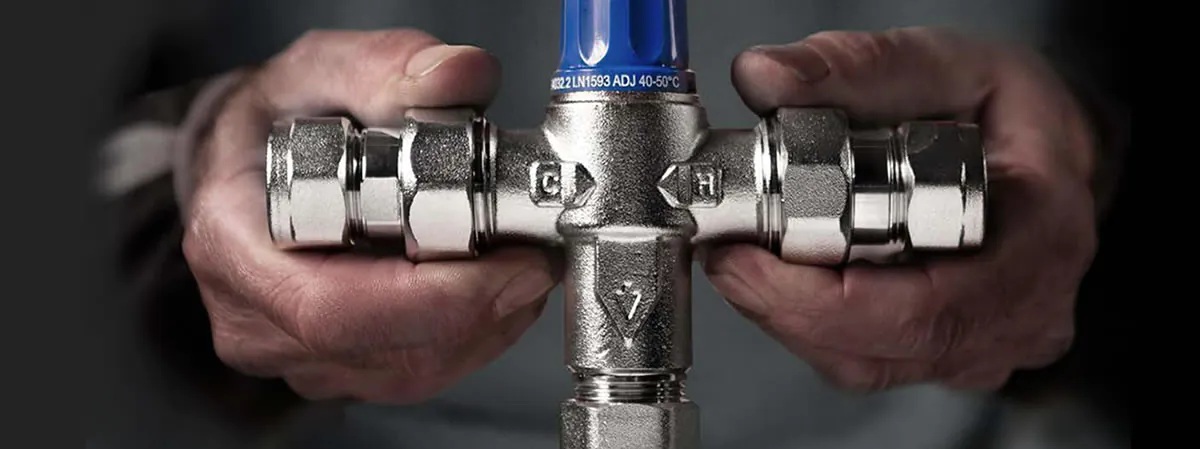
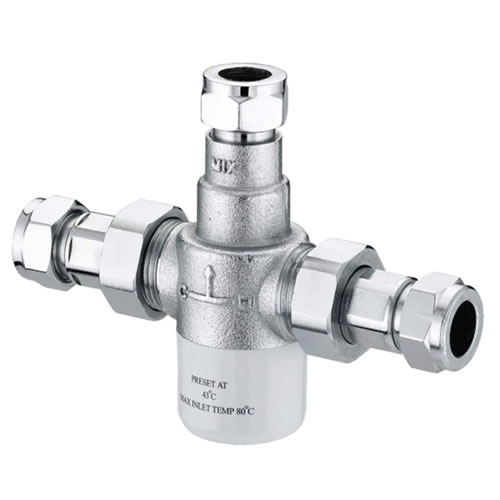
Types Of Scald-prevention Valves
Scald-prevention valves help keep water temperature safe. They stop sudden hot water bursts that can cause burns.
There are different types of these valves. Each type works in a unique way to control water temperature.
Thermostatic Mixing Valves
Thermostatic mixing valves mix hot and cold water. They keep water at a steady, set temperature.
These valves adjust automatically. If hot water gets too hot, they add cold water to balance it.
- Provide precise temperature control
- React quickly to temperature changes
- Ideal for showers and sinks
Pressure-balancing Valves
Pressure-balancing valves keep water temperature steady. They adjust water flow when pressure changes.
If cold water pressure drops, they reduce hot water flow. This stops sudden temperature spikes.
- Balance water pressure to prevent scalds
- Common in bathtubs and showers
- Simple and cost-effective option
Temperature Limiting Valves
Temperature limiting valves set a maximum water temperature. They block water from getting too hot.
These valves are easy to install. They provide a safe upper limit for water temperature.
- Set maximum temperature to prevent burns
- Work with existing plumbing systems
- Good for homes with children or elderly
Choosing The Right Valve
Installing scald-prevention valves helps keep water safe. Picking the right valve is important for your home’s safety and comfort.
This guide covers key points to consider before buying a valve for your plumbing system.
Assessing Water Temperature Needs
Check the ideal water temperature for your home or building. Different places need different temperature settings to prevent burns.
Think about who uses the water. Children and elderly people need lower temperatures for safety.
Compatibility With Plumbing Systems
Make sure the valve fits your current plumbing setup. Valves come in different sizes and connection types.
Check if your pipes are copper, PVC, or another material. Some valves work better with certain pipe types.
- Match valve size to pipe diameter
- Choose valves rated for your pipe material
- Consider valve type: thermostatic or pressure-balancing
Budget Considerations
Set a budget before buying a valve. Prices vary based on valve type and features.
Think about long-term savings. A good valve can reduce water waste and energy costs.
- Basic valves cost less but may have fewer features
- Higher-priced valves often offer better durability
- Consider installation costs along with valve price

Credit: www.commercialwashroomsltd.co.uk
Tools And Materials Needed
Installing scald-prevention valves helps keep water temperature safe. You need the right tools and materials for this job.
This guide lists the key items to gather before starting the installation.
Adjustable Wrench
An adjustable wrench fits different pipe sizes. It helps tighten or loosen nuts during installation.
Choose a wrench that is comfortable to hold and easy to adjust.
Teflon Tape
Teflon tape seals pipe threads. It stops leaks where parts connect.
Wrap the tape around the threads before joining pipes or valves.
Pipe Cutter Or Hacksaw
You need a pipe cutter or hacksaw to cut pipes to the right length. A clean cut helps make a good seal.
Use a tool that matches your pipe material, such as copper or PVC.
Scald-prevention Valve
The valve controls water temperature to prevent burns. Choose one that fits your plumbing system.
Check the valve’s specifications to ensure it meets safety standards.
Screwdriver Set
Screwdrivers help secure valve parts or remove fittings. A set with flathead and Phillips heads works best.
Use the correct size screwdriver to avoid damaging screws.
Bucket Or Container
A bucket catches water when you disconnect pipes. It keeps your work area clean and dry.
Choose a container large enough for any water left in the pipes.
Cleaning Cloth
A cloth cleans pipe ends and valve parts. It removes dirt and debris before installation.
Keep the cloth handy for quick cleanup during the process.
Step-by-step Installation Guide
Installing a scald-prevention valve helps keep water temperature safe. This guide shows you how to install it easily.
Follow each step carefully to ensure your valve works correctly and protects against hot water burns.
Shutting Off Water Supply
Start by turning off the main water supply to your home. This stops water flow and prevents leaks during installation.
Check that no water comes out of the faucet by opening it after shutting off the supply.
- Locate the main water shut-off valve
- Turn the valve clockwise to close it
- Open a faucet to release any remaining water
Removing Old Fixtures
Remove the existing faucet or fixture where you want to install the valve. This clears space for the new part.
Use a wrench to loosen nuts and disconnect pipes carefully. Keep a bucket handy to catch water.
- Loosen mounting nuts with an adjustable wrench
- Disconnect water supply lines gently
- Remove the old fixture and clean the area
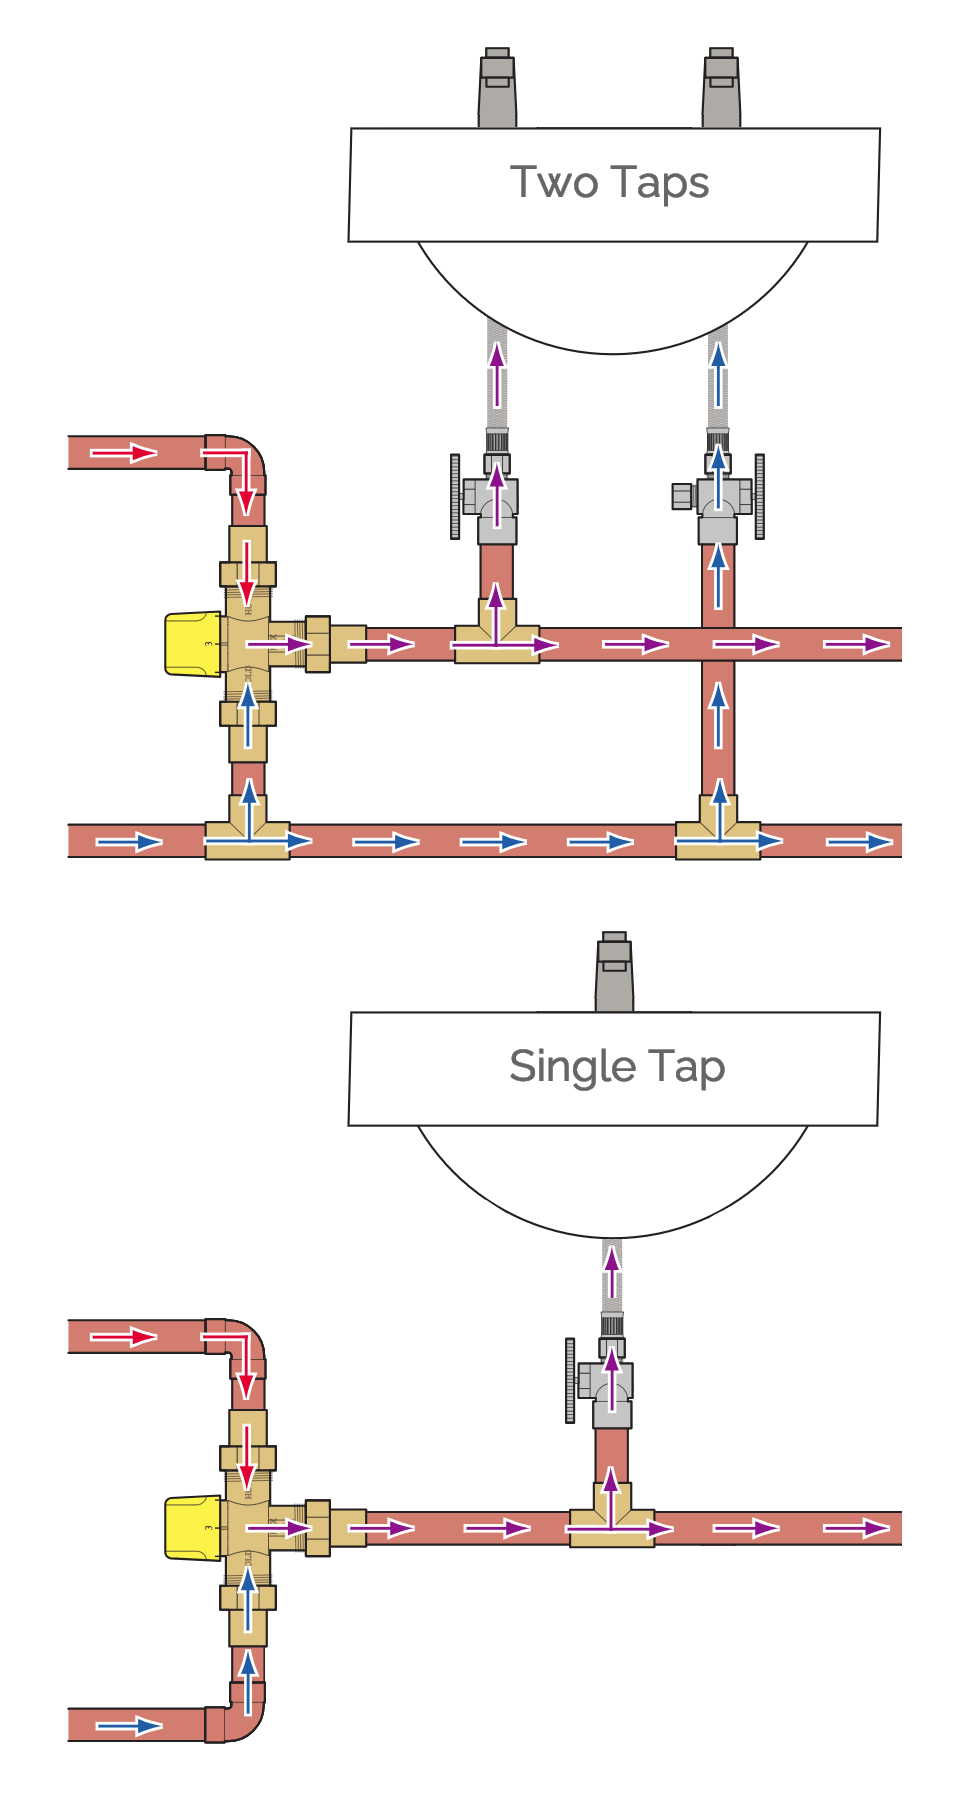
Installing The Valve
Place the scald-prevention valve in the correct position according to the instructions. Connect all pipes tightly.
Use plumber’s tape on threaded connections to avoid leaks. Tighten all fittings but do not over-tighten.
- Apply plumber’s tape to threads
- Connect hot and cold water lines to the valve
- Secure the valve with mounting hardware
Testing For Proper Function
Turn the main water supply back on slowly. Check all connections for leaks and proper water flow.
Test the valve by adjusting water temperature. Make sure hot water does not exceed safe levels.
- Open faucets and watch for leaks
- Adjust valve settings as needed
- Confirm water temperature stays safe
Common Installation Mistakes To Avoid
Installing scald-prevention valves is important to keep water safe. Incorrect installation can cause problems.
This guide shows common mistakes to avoid during installation. Follow these tips for better results.
Ignoring Manufacturer Instructions
Each valve model has specific instructions. Ignoring them can cause leaks or poor performance.
Always read and follow the manual carefully. Use the recommended tools and parts.
Incorrect Valve Positioning
Placing the valve in the wrong spot can reduce its effectiveness. Install it close to the water heater.
Position the valve in a place that allows easy access for maintenance and adjustments.
Not Checking Water Pressure
High or low water pressure can damage the valve. Test the pressure before installation.
Make sure pressure stays within the valve’s limits to avoid failure or leaks.
Skipping Temperature Adjustment
Failing to set the correct temperature defeats the valve’s purpose. Adjust it to a safe level.
Use a thermometer to check water temperature after installation to ensure safety.
Poor Pipe Connections
Loose or wrong connections cause leaks and water damage. Tighten all fittings properly.
Use pipe sealant or tape to secure joints and prevent leaks.
- Check for leaks after installation
- Use correct pipe sizes
- Avoid forcing pipes into valves
Ignoring Regular Maintenance
Valves need regular checks to work well. Skip maintenance and you risk failures.
Clean valves and test them at least once a year to keep water safe.
Maintenance Tips For Longevity
Scald-prevention valves protect you from hot water burns. Keeping them in good shape helps them work well.
Regular care makes these valves last longer and keeps your water temperature safe.
Regular Inspection
Check valves often for leaks or damage. Look for cracks, corrosion, or loose parts.
Test water temperature at different taps to ensure the valve controls heat properly.
- Inspect valves every 3 to 6 months
- Check for any unusual noises or drips
- Ensure valves are securely mounted
- Test water temperature regularly
Cleaning Procedures
Clean valves to remove dirt and mineral buildup. Use mild soap and water to wipe the surface.
Avoid harsh chemicals that can damage valve parts. Soak removable parts in vinegar to dissolve scale.
- Turn off water supply before cleaning
- Remove valve covers carefully
- Use soft brushes for scrubbing
- Rinse parts thoroughly after cleaning
- Dry parts completely before reassembly
When To Replace Valves
Replace valves if they leak or fail to control temperature. Old valves may not work well anymore.
If repairs do not fix issues, replacement is safer. Follow manufacturer guidelines for valve lifespan.
- Replace valves showing cracks or corrosion
- Change valves after 5 to 7 years
- Replace if water temperature fluctuates
- Upgrade if valves no longer meet safety standards
Credit: www.commercialwashroomsltd.co.uk
Safety Precautions During Installation
Installing scald-prevention valves helps protect against hot water burns. It is important to follow safety steps during installation.
These precautions keep you safe and ensure the valves work correctly to prevent scalding.
Protective Gear
Wear proper protective gear before starting the installation. Gloves protect your hands from hot water and sharp edges.
Safety glasses shield your eyes from splashes or debris. Long sleeves help avoid burns or cuts.
- Heat-resistant gloves
- Safety goggles or glasses
- Long-sleeved clothing
- Closed-toe shoes
Handling Hot Water Systems
Turn off the water heater before working on the system. This stops hot water flow and lowers burn risk.
Drain any hot water in the pipes carefully. Use tools made for plumbing to avoid damage.
- Shut off the water heater power or gas
- Close the main water supply valve
- Open faucets to drain hot water
- Use pipe wrenches and pliers safely
Emergency Preparedness
Keep a first aid kit nearby in case of burns or cuts. Know the location of emergency shut-off valves.
Have a phone ready to call for help if needed. Plan your steps to avoid rushing and mistakes.
- First aid kit with burn cream and bandages
- Know where water shut-off valves are
- Have emergency contact numbers handy
- Work slowly and carefully
Frequently Asked Questions
What Are Scald-prevention Valves Used For?
Scald-prevention valves control water temperature to prevent burns. They mix hot and cold water for safe output. These valves are essential in homes, schools, and healthcare facilities. They ensure safety for children, elderly, and sensitive skin users. Installing them reduces scalding accidents effectively.
How Do You Install A Scald-prevention Valve?
Installation involves turning off water supply and removing existing valves. Fit the scald-prevention valve according to manufacturer instructions. Secure connections to prevent leaks and test the water temperature. It’s recommended to hire a professional plumber for proper installation. Regular maintenance ensures long-term safety and function.
Can Scald-prevention Valves Save Water And Energy?
Yes, these valves help maintain consistent water temperature. They reduce the need to run water to achieve desired warmth. This leads to less water wastage and energy consumption for heating. Using scald-prevention valves supports eco-friendly practices and lowers utility bills.
Where Should Scald-prevention Valves Be Installed?
Valves should be installed at points where hot water is delivered. Common locations include showers, bathtubs, and bathroom sinks. Installing at the water heater output is also effective. This ensures all outlets provide safe water temperatures. Proper placement maximizes safety and efficiency.
Conclusion
Installing scald-prevention valves keeps your home safe and comfortable. These devices control water temperature effectively. Protecting your family from accidental burns is crucial. Installation is straightforward, requiring minimal tools and skills. Regular checks ensure the valves function properly. This simple addition offers peace of mind.
No more unexpected hot water surprises. Consider upgrading your plumbing today. Experience a safer bathing environment. Your family’s safety is worth the effort. Whether new or experienced, this task is manageable. Take the step towards enhanced home safety. Enjoy the comfort and security scald-prevention valves provide.

