

16 min read
Are you ready to give your bathroom a fresh new look without a full renovation? Installing a shower valve trim kit is a simple upgrade that can make a big difference in both style and function.
Whether you want to fix a dripping faucet or just want a sleek, modern finish, this guide will walk you through every step. By the end, you’ll have the confidence to complete the job yourself and enjoy a more comfortable shower experience.
Keep reading, and you’ll see how easy it really is to transform your shower with just a few tools and some basic know-how.
Credit: www.youtube.com
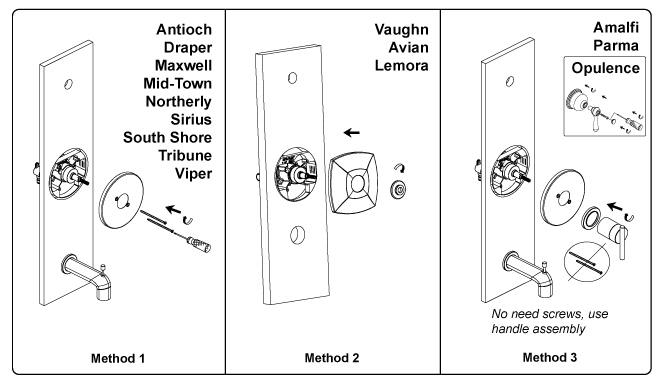
Choosing The Right Trim Kit
Installing a shower valve trim kit changes the look of your shower. It also controls water flow and temperature.
Picking the right trim kit makes installation easier. It also ensures your shower works well and looks good.
Types Of Shower Valve Trim Kits
There are several types of shower valve trim kits. Each type fits different shower setups and styles.
- Single-handle kits control water with one lever.
- Dual-handle kits have separate controls for hot and cold water.
- Thermostatic kits keep water temperature steady.
- Diverter kits allow switching between showerhead and tub spout.
Materials And Finishes
Trim kits come in different materials like brass, stainless steel, and plastic. Each material affects durability and cost.
Finishes add style and protect the kit from water damage. Choose a finish that matches your bathroom decor.
- Chrome is shiny and easy to clean.
- Brushed nickel hides water spots and fingerprints.
- Oil-rubbed bronze gives a dark, classic look.
- Matte black adds a modern, bold style.
Compatibility With Existing Valves
Trim kits must fit your shower valve. Check the brand and model before buying a kit.
Some kits work only with specific valves. Using the wrong kit can cause leaks or poor performance.
- Look for trim kits labeled for your valve brand.
- Measure the valve size and check the handle style.
- Use adapters if needed to fit different valves.
- Read product instructions to confirm compatibility.
Credit: www.youtube.com
Gathering Necessary Tools
Installing a shower valve trim kit needs the right tools. Using proper tools makes the job easier.
Before starting, gather everything you need. This saves time and avoids frustration.
Basic Tools Checklist
You need some basic tools to install the shower valve trim kit. These tools help you remove old parts and fit new ones.
- Adjustable wrench for tightening nuts and bolts
- Screwdriver set including flathead and Phillips
- Plumber’s tape to seal threaded joints
- Allen wrench set for handle screws
- Utility knife to cut caulk or old sealant
- Bucket to catch any water drips
- Towels or rags for cleaning and drying
Safety Equipment
Safety gear protects you while working with plumbing parts. Always use safety equipment to avoid injuries.
- Safety glasses to protect your eyes from debris
- Work gloves to protect your hands from sharp edges
- Knee pads if you need to kneel for long periods
- Closed-toe shoes to protect your feet
Preparing The Shower Area
Installing a shower valve trim kit starts with getting the shower area ready. Proper preparation helps the installation go smoothly and safely.
Cleaning and removing old parts makes sure the new trim fits well. Turning off the water supply stops leaks and water damage.
Turning Off Water Supply
Before you start, turn off the water supply to the shower. This prevents water from flowing while you work on the valve.
Look for the main water shutoff valve or the local valve for the shower. Close it fully to stop water flow.
- Find the main water valve or shower valve
- Turn the valve clockwise to close it
- Open a faucet to release water pressure
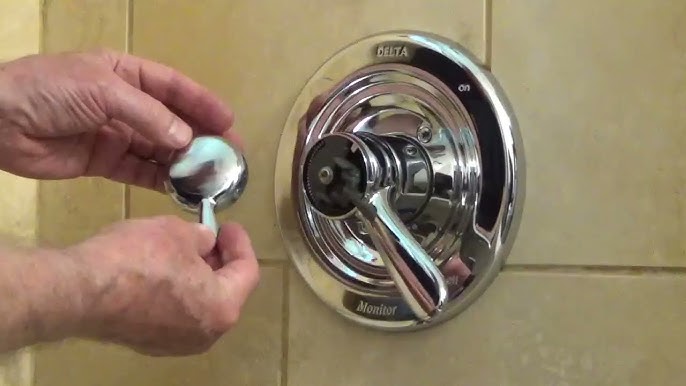
Removing Old Trim Components
Remove the old handle, escutcheon plate, and any other trim parts carefully. Use the right tools to avoid damage.
Keep screws and small parts in a safe place. Check for any signs of damage or rust on the valve body.
- Unscrew the handle with a screwdriver or Allen wrench
- Take off the escutcheon plate by loosening screws
- Remove any decorative caps or covers
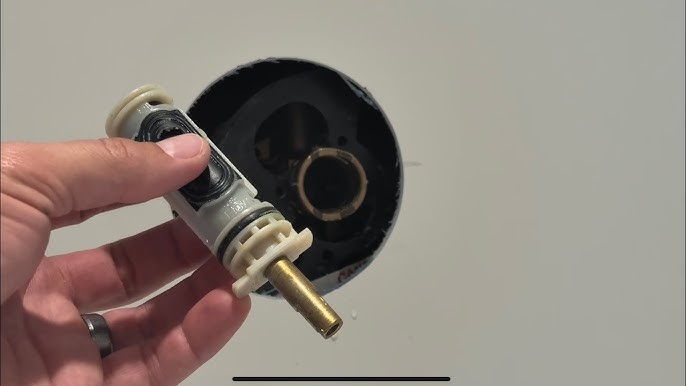
Cleaning The Valve Body
Clean the valve body with a soft cloth to remove dirt and old sealant. This helps the new trim sit flush and work well.
Check for mineral buildup or corrosion. Use vinegar or a gentle cleaner if needed. Avoid harsh chemicals that can damage parts.
- Wipe the valve body with a damp cloth
- Use vinegar to remove mineral deposits
- Dry the area before installing new trim

Credit: www.amazon.ca
Installing The New Valve Trim
Installing a new shower valve trim can refresh your bathroom look. It also helps control water flow and temperature.
Follow these steps carefully to attach the valve cartridge, secure the trim plate, and install handles and accessories.
Attaching The Valve Cartridge
Start by placing the valve cartridge into the valve body. Make sure it fits snugly without forcing it.
Align the cartridge so that the tabs match the slots inside the valve. This ensures proper water flow control.
- Check that the cartridge is clean and free of debris
- Insert the cartridge gently into the valve body
- Turn the cartridge until it locks into place
- Secure the cartridge with the provided retaining clip or screw
Securing The Trim Plate
Place the trim plate over the valve opening on the wall. It covers the plumbing and gives a clean look.
Align the screw holes on the trim plate with the mounting holes on the valve. Use a screwdriver to tighten the screws evenly.
- Make sure the trim plate sits flush against the wall
- Tighten screws without over-tightening to avoid damage
- Check for gaps and adjust if needed
Installing Handles And Accessories
Attach the handles to the valve stems by aligning them properly. Push or slide the handles onto the stems firmly.
Secure the handles with screws or set screws as instructed by the manufacturer. Add any decorative accessories last.
- Align handle indicators for hot and cold water
- Use the right tool to tighten handle screws
- Test handle movement to ensure smooth operation
- Attach any decorative caps or covers
Testing And Adjustments
After installing your shower valve trim kit, it is important to test and adjust it. This ensures the valve works properly and there are no leaks.
Testing helps you find issues early. Adjustments improve handle feel and water control.
Turning On Water Supply
Turn the main water supply back on slowly. Watch the shower valve area carefully for any signs of water flow.
Make sure both hot and cold water lines are working. This step prepares the valve for testing and adjustments.
Checking For Leaks
Look closely around the valve trim and connections. Check for any water dripping or pooling.
If you see leaks, tighten the screws or fittings gently. Do not overtighten to avoid damage.
- Inspect behind the trim plate
- Check around the handle base
- Look at pipe connections inside the wall
Adjusting Handle Operation
Test the handle by turning it on and off. It should move smoothly without sticking or too much looseness.
If the handle is hard to turn, adjust the set screw or reposition the handle. If loose, tighten the fixing screw.
- Turn handle fully to hot and cold positions
- Check for smooth rotation
- Make small adjustments to handle screws
Maintenance Tips
Keeping your shower valve trim kit clean and well-maintained helps it last longer. Regular care can prevent damage and keep it working smoothly.
Simple checks and cleaning routines save you from costly repairs. Learn easy ways to maintain your shower valve trim kit below.
Cleaning And Care
Clean the trim kit gently to avoid scratches. Use mild soap and a soft cloth for best results.
Do not use harsh cleaners or abrasive tools. These can damage the finish and cause leaks.
- Wipe the trim kit weekly to remove soap scum and dirt
- Dry the surface after each use to stop water spots
- Check for mineral buildup and clean it with vinegar if needed
- Polish with a non-abrasive cleaner to keep shine
Troubleshooting Common Issues
If your shower valve trim kit leaks or feels loose, check the screws and seals. Tighten or replace parts if needed.
Temperature changes or water pressure problems may cause the valve to not work well. Test these and fix as needed.
- Fix leaks by tightening screws or replacing washers
- Remove mineral deposits from the valve for smooth operation
- Adjust water pressure if the flow is uneven
- Replace worn parts to avoid bigger damage
Frequently Asked Questions
What Tools Are Needed To Install A Shower Valve Trim Kit?
You need a screwdriver, adjustable wrench, plumber’s tape, and a silicone sealant. These tools help secure the trim and ensure leak-proof installation.
How Do I Remove The Old Shower Valve Trim Kit?
Turn off water supply, unscrew the handle, and carefully remove the trim plate. Use a wrench if needed and clean the valve area before installing the new trim.
Can I Install A Shower Valve Trim Kit Myself?
Yes, with basic plumbing skills and proper tools, you can install it yourself. Follow manufacturer instructions carefully to avoid leaks and ensure correct fitting.
How To Prevent Leaks After Installing Shower Valve Trim?
Apply plumber’s tape to threads and tighten fittings properly. Check for leaks by turning on water slowly and inspect all connections for drips.
Conclusion
Completing a shower valve trim kit installation offers satisfaction and convenience. Proper installation ensures long-lasting performance and a beautiful bathroom upgrade. Remember to double-check all connections. Tighten screws securely to prevent leaks. A little patience goes a long way during the process.
Always refer to the manufacturer’s instructions. This helps avoid common mistakes. Enjoy your new shower experience. It adds comfort and style to your space. Keep your tools handy for future projects. Now, relax and enjoy your refreshed bathroom.

