

17 min read
Are you tired of cluttered sinks and slippery soap bottles? Installing a soap dispenser holder can change the way you organize your bathroom or kitchen, making your space cleaner and more convenient.
Imagine reaching for your soap without fumbling or spills—just a simple, smooth motion every time. In this guide, you’ll discover easy steps to install a soap dispenser holder yourself, saving time and avoiding costly mistakes. Ready to transform your daily routine with a small change that makes a big difference?
Let’s dive in and make your space smarter and tidier.
Credit: www.amazon.com
Choosing The Right Soap Dispenser Holder
Selecting the right soap dispenser holder is important for your bathroom or kitchen. It keeps your soap organized and easy to use.
There are many types of holders. Think about the material, design, and size before you buy.
Material Options
Soap dispenser holders come in different materials. Each material has benefits and fits different styles.
- Plastic:Lightweight and affordable. Easy to clean but less durable.
- Stainless Steel:Strong and rust-resistant. Good for wet areas.
- Ceramic:Looks elegant. Can be fragile and heavy.
- Glass:Stylish and modern. Needs careful handling.
- Wood:Natural look. Needs sealing to avoid water damage.
Design Styles
Choose a style that matches your room. The holder should blend with your decor and be easy to use.
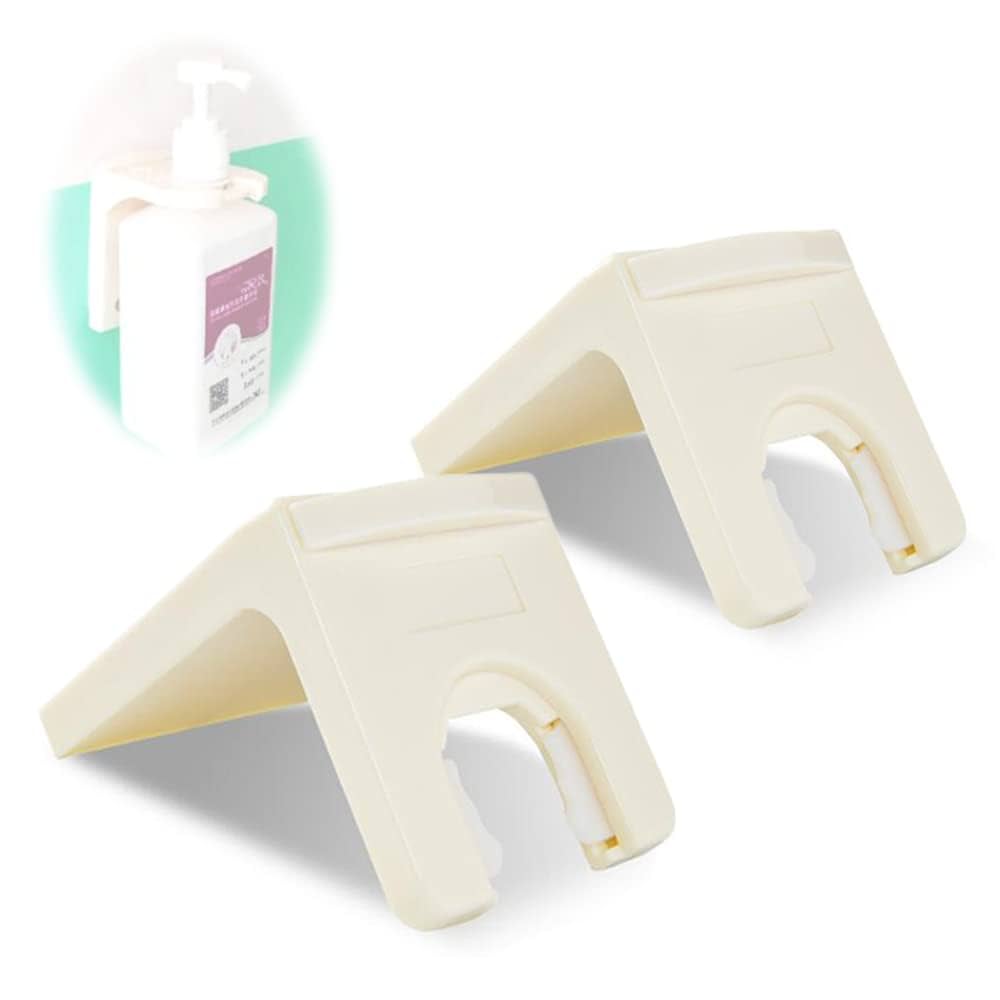
- Wall-Mounted:Saves counter space and looks neat.
- Countertop:Easy to move and refill.
- Built-In:Integrated with sink or countertop for a clean look.
- Decorative:Adds style with colors and patterns.
Size Considerations
Check the size of the holder before buying. It should fit your soap bottle and space well.
Measure the area where you want to place it. Choose a size that is not too big or too small.
- Small holders save space but hold less soap.
- Large holders last longer but need more room.
- Make sure the holder fits your soap dispenser bottle.
Tools And Materials Needed
Installing a soap dispenser holder is an easy task with the right tools. Gather all the items before you start. This helps you finish the job smoothly.
Knowing what tools and materials you need saves time. It also prevents mistakes during installation.
Basic Tools
Basic tools help you mount the soap dispenser holder securely. These tools are common in most toolkits.
- Drill with drill bits
- Screwdriver (Phillips or flathead)
- Measuring tape
- Level
- Pencil or marker
- Wall anchors and screws
Use the drill to make holes. The screwdriver tightens screws. Measure carefully to place the holder straight.
Additional Supplies
Some extra supplies make installation easier and last longer. Choose supplies that fit your wall type.
- Soap dispenser holder kit
- Wall anchors for drywall or tile
- Masking tape
- Cleaning cloth
- Silicone sealant (optional)
Masking tape helps mark spots without damage. Clean the wall before fixing the holder. Use sealant to prevent water damage.
Preparing The Installation Area
Before installing a soap dispenser holder, prepare the area well. This helps the holder stick firmly.
A clean and marked surface makes installation easier and more accurate.
Cleaning The Surface
Clean the wall or surface where you will place the soap dispenser holder. Dirt and dust stop it from sticking well.
Use a cloth with rubbing alcohol or mild soap to wipe the area. Let it dry completely before installing.
Marking Placement
Decide where the soap dispenser holder will go. Mark this spot with a pencil or tape.
Check the height and position to make sure it is easy to reach and looks good.
- Hold the dispenser holder against the wall
- Use a pencil to mark screw holes or edges
- Double-check the marks before drilling or fixing

Credit: www.amazon.ca
Mounting Methods
Installing a soap dispenser holder requires choosing the right mounting method. The choice depends on your wall type and personal preference.
Each method has its benefits and suits different installation needs. Below are common mounting methods for soap dispenser holders.
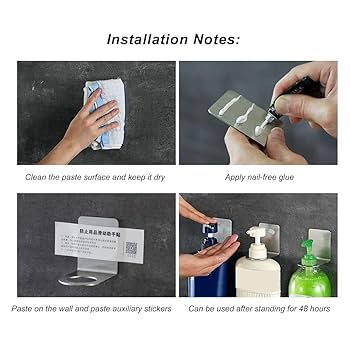
Adhesive Mounting
Adhesive mounting uses strong glue or tape to stick the holder on the wall. This method is quick and does not need drilling.
It works best on smooth, clean surfaces like tiles or glass. Avoid rough or uneven walls for better hold.
- Clean the wall surface well before applying adhesive
- Press the holder firmly for at least 30 seconds
- Wait 24 hours before placing heavy items
Screw Mounting
Screw mounting secures the holder with screws and anchors. It is very strong and good for heavy dispensers.
This method needs drilling holes in the wall. Use proper tools and anchors for drywall or tile.
- Mark the drill points on the wall
- Drill holes and insert wall anchors
- Attach the holder with screws tightly
Magnetic Mounting
Magnetic mounting uses magnets to hold the soap dispenser holder in place. It allows easy removal and repositioning.
This method works well on metal surfaces. It does not damage the wall and needs no tools.
- Attach the magnetic plate to the wall or metal surface
- Place the holder with a metal base on the magnet
- Check the strength before use to avoid falls
Step-by-step Installation Guide
Installing a soap dispenser holder is easy if you follow simple steps. This guide helps you set up the holder securely and correctly.
Take your time to position, secure, and adjust the holder for the best use. Let’s start with placing the holder in the right spot.
Positioning The Holder
Choose a spot near the sink or where you wash your hands. It should be easy to reach but not in the way.
Make sure the wall or surface is clean and dry before you place the holder. This helps it stick or stay fixed better.
- Pick a height that suits all users
- Avoid placing it too close to water splashes
- Check for studs or solid surfaces if drilling
Securing The Holder
Use the right tools to fix the holder on the wall. This can be screws, adhesive tape, or suction cups depending on the holder type.
Follow the instructions that come with your holder for the best results. Make sure it is tight and will not fall off easily.
- Mark drill holes if needed
- Use a level to keep the holder straight
- Tighten screws firmly but don’t overdo it
- Press adhesive tape firmly for good stickiness
Final Adjustments
Check the holder after installation. Make sure it holds the soap dispenser well and does not move.
Adjust the position slightly if needed. Clean the area around the holder to keep it neat and ready to use.
- Test with a filled soap dispenser
- Wipe away dust or marks
- Ensure easy access and comfortable use
Maintenance Tips
Keeping your soap dispenser holder clean and safe helps it last longer. Regular care stops damage and keeps it looking good.
Follow simple steps to clean and protect your holder. This saves time and money on repairs or replacements.
Cleaning The Holder
Clean the soap dispenser holder often to remove soap scum and dirt. Use mild soap and warm water for best results.
Avoid harsh chemicals that can damage the holder’s surface. Dry the holder completely to prevent water spots and rust.
- Use a soft cloth or sponge
- Rinse with clean water
- Dry with a towel after cleaning
- Clean weekly for best care
Preventing Damage
Prevent damage by handling the holder gently. Avoid dropping or banging it against hard surfaces.
Keep the holder away from direct sunlight and extreme heat. These conditions can weaken the material over time.
- Install the holder securely on a strong wall
- Do not overload with heavy bottles
- Check for loose screws regularly
- Keep away from sharp objects
Troubleshooting Common Issues
Installing a soap dispenser holder may seem simple. Some problems can happen during or after the installation.
This guide helps you fix common problems to keep your holder secure and working well.
Loose Holder
A loose holder can fall or move easily. It is unsafe and annoying.
Check if screws or mounts are tight. If using adhesive, the surface may be dirty or wet.
- Tighten all screws firmly but do not over-tighten.
- Clean the wall surface before attaching the holder.
- Use anchors if mounting on drywall for extra support.
Adhesive Problems
Adhesive may not stick well, causing the holder to fall off.
Make sure the wall is dry and free from dust or grease. Use the right type of adhesive for your wall.
- Wipe the surface with rubbing alcohol before applying adhesive.
- Press the holder firmly for at least 30 seconds.
- Allow adhesive to cure for recommended time before use.
Alignment Fixes
Misaligned holders look bad and can cause soap dispenser problems.
Use a level tool to check straightness. Mark the spots before drilling or sticking.
- Use a pencil to mark holes or adhesive points.
- Check alignment with a level or measuring tape.
- Adjust before fixing the holder permanently.

Credit: www.amazon.ca
Frequently Asked Questions
How Do I Install A Soap Dispenser Holder?
To install a soap dispenser holder, clean the wall surface first. Mark the position, drill holes, insert anchors, and screw the holder firmly. Use a level to ensure it’s straight for a neat look.
What Tools Are Needed For Installation?
You need a drill, screwdriver, level, measuring tape, pencil, and wall anchors. These tools help ensure the holder is securely mounted and aligned properly.
Can I Install A Holder On Tiled Walls?
Yes, you can. Use a carbide-tipped drill bit designed for tiles. Drill carefully to avoid cracking, then follow standard installation steps with anchors and screws.
How High Should I Mount A Soap Dispenser Holder?
Mount the holder at a comfortable height, usually between 48 to 52 inches from the floor. This height suits most users for easy access and convenience.
Conclusion
Installing a soap dispenser holder is simple and convenient. It enhances bathroom organization. Follow the steps carefully for a successful installation. Choose a location within easy reach. Ensure the surface is clean and dry. Use appropriate tools for a secure fit.
Double-check your work to avoid mistakes. A well-placed holder keeps soap accessible. It also adds style to your space. Enjoy a clutter-free and tidy bathroom. With these tips, anyone can install it easily. Your bathroom will be neat and orderly.
Happy organizing!

